heliOS Software
Download 2026.2
WARNING:
- For each new version of heliOS it is mandatory to update the methods
- heliOS 2026.2 requires Microsoft .NET Desktop Runtime 10
- When using a shared database, please ensure that all heliOS instances are on the same version
heliOS
version 2026.2.1
(125 MB)
(29.06.2026)
heliOS Methods
for switchSENSE®
version 2026.2 (1 MB)
(11.05.2026)
heliOS Methods
for scIC (formerly RT-IC)
version 2026.2 (0.7 MB)
(11.05.2026)
heliX Firmware
version 8.5.5
(1.9 GB)
(02.06.2026)
heliX Firmware Quick Update Guide
Please update your heliX instrument’s firmware to the newest version 8.0+ using heliOS software. If your firmware is still on version 7.X, upgrading to 8.X requires a maintenance visit; please contact customer support.
Update Steps:
- Download the latest firmware from this page.
- Open heliOS , connect to the instrument, request control, and select “Update Firmware” (bottom right) to install the update.
- Once update is installed, restart the heliX instrument via “Reboot Device” in heliOS or manually, then verify the firmware version in heliOS (bottom right).
Caution: Please ensure a stable power connection for the heliX instrument during the update. For more details, please consult the heliX guides or contact customer support.
SYSTEM REQUIREMENTS
Supported Operating System | Windows 10 and higher.
heliOS requires the .NET 10 Desktop Runtime.
heliOS requires access to a postgreSQL database.
→ see install instructions
- RELEASE NOTES - heliOS 2026.2
- CHANGELOG 2026.2
- CHANGELOG 2026.2.1
- scIC NOTES (formerly RT-IC)
- switchSENSE NOTES
Release Notes
This release introduces a new conformational change analysis and focuses on clearer chip status feedback, more efficient bulk operations, streamlined assay workflow creation, and cleaner device management.
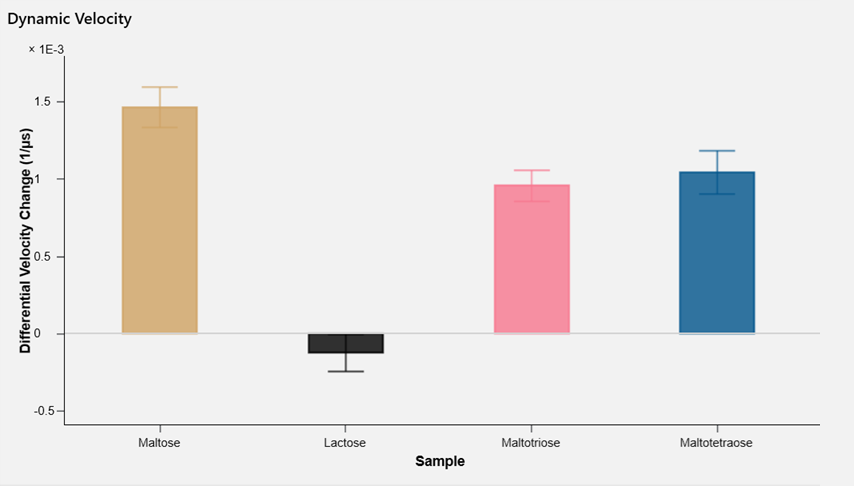
New Conformational Change Analysis
heliOS 2026.2 introduces a newly developed conformational change analysis utilizing DNA origami nanolevers.
In contrast to the previously used Dynamic Lag model, the new analysis is centered around directly quantifying differences in molecular friction by measuring differential oscillation velocities of proteins and other biomolecules across distinct conformational states.
Subtle changes in three-dimensional molecular geometry can thus be detected upon analyte binding, manifested as significant differences in velocities.
Quantifying conformational change this way offers the advantage of a direct proportional relationship to variations in hydrodynamic radius, improving physical interpretability of results while retaining a clear and intuitive analytical framework.
Expired Chips
To ensure data quality and experimental integrity, heliOS now provides clear indications when expired chips are used or detected on the device.
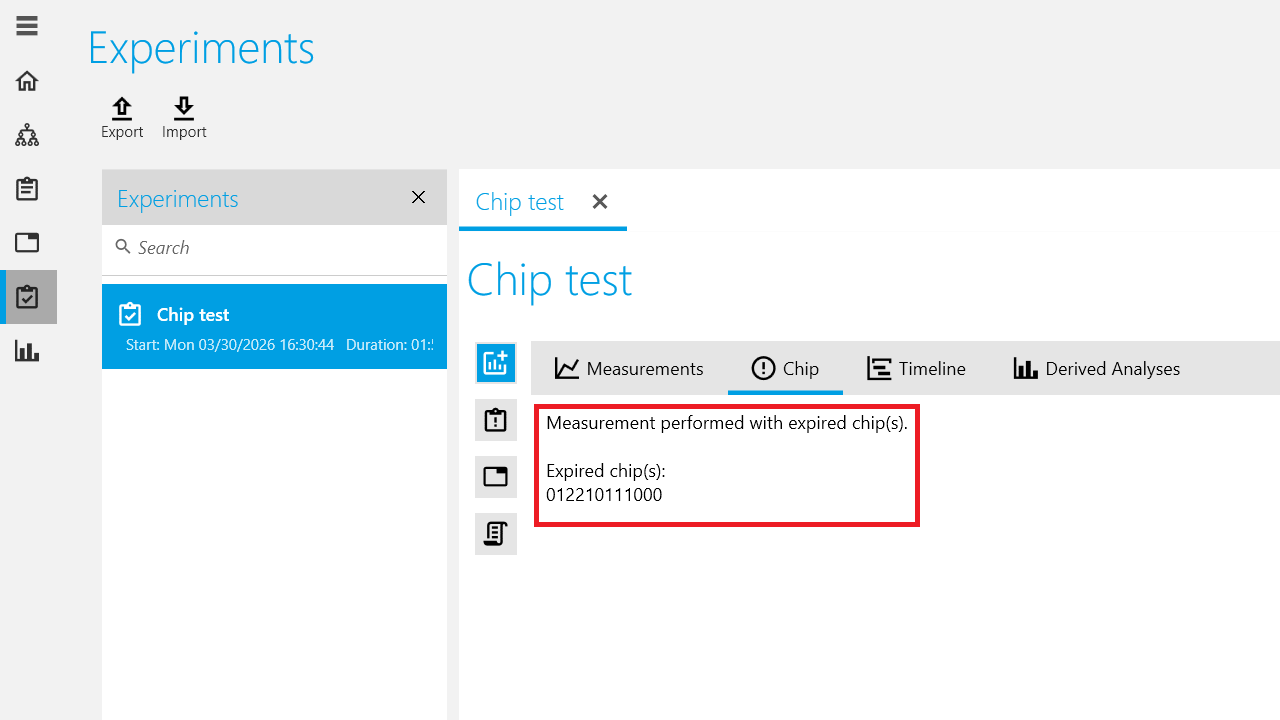
Warning in Experiments View
If an experiment was performed using one or more expired chips, heliOS will now display a warning.
A new Chip tab, marked with an exclamation icon, is added to the experiment view. This tab lists the IDs of all expired chips involved in the measurement, helping you quickly identify potential impacts on your results.
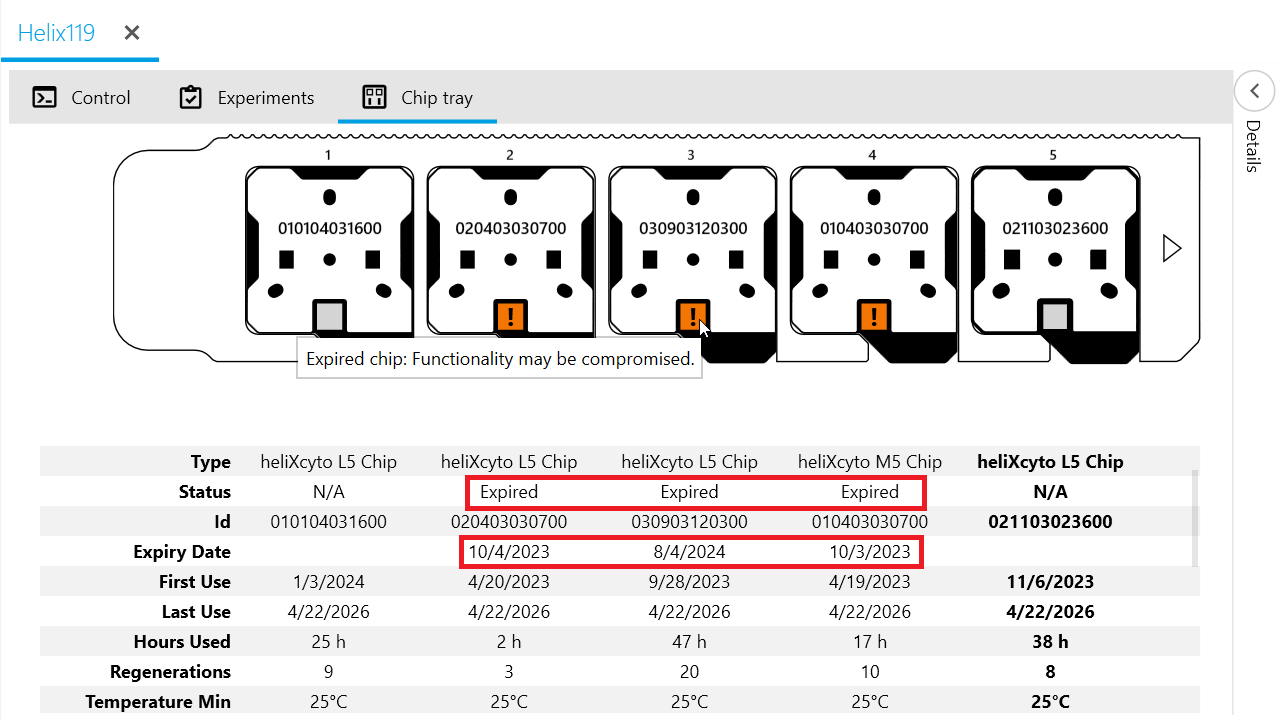
Highlighting on Device
Expired chips are now also highlighted directly in the device’s Chip tray view.
If a chip is detected as expired, its position is marked with an orange warning indicator. Hovering over the expired chip provides a tooltip warning: “Expired chip: functionality may be compromised.”
Enable Bulk Actions for Documents
Managing documents is now more efficient. In previous releases, Methods, Assay Workflows, and Experiments could only be selected one at a time for deletion or export.
With this release, you can now select multiple documents and export or delete them in one action.
Selecting Multiple Documents
Document lists now support standard multi-selection behavior:
- Hold Ctrl and click individual documents to add or remove them from the selection.
- Click the first document, then hold Shift and click another document to select the full range between them.
Deleting Multiple Documents
You can now select multiple documents and delete them in one action.
Exporting and Importing Multiple Documents
Multiple selected documents can now be exported together into a single heliOS export file. This makes it easier to transfer related Methods, Assay Workflows, and Experiments between heliOS installations.
heliOS export files now use the dedicated .hos file extension instead of the generic .zip extension.
This clearly distinguishes heliOS exports from regular zip archives and helps prevent import issues caused by selecting files that were not created by heliOS.
 Multiple heliOS documents can now be imported from one .hos file.
 Previous .zip files can still be imported by selecting the “Legacy heliOS export” format during importing.
Dedicated heliOS Export File Icon
Files with the .hos extension now use a dedicated heliOS export icon. This icon is different from the heliOS application icon, making exported document packages easier to recognize in the file system.
![]()
Downloading Multiple Experiments at Once
Previously, downloading multiple experiments was cumbersome, as only one experiment could be downloaded at a time.
With this release, you can now download multiple experiments simultaneously, significantly speeding up the process.
Deleting Experiments From a Device
In previous releases, it was not possible to delete experiments from a device, which could lead to devices becoming cluttered with experiments that were no longer needed.
With this release, you can now remove experiments from a device, making it easier to keep devices clean and organized.
Simplified Assay Workflow Creation
This release introduces several improvements to make creating and managing assay workflows faster and more intuitive.
Add Assays with a Single Click
Assays can now be added to a workflow with a single click, reducing the number of required steps.
Newly added assays are placed at the end of the existing workflow.
Add Multiple Assays at Once
Multiple assays can now be added to a workflow in a single step, reducing repetitive actions.
They are appended to the end of the current workflow.
Drag and Drop Multiple Assays into a Specific Position Within an Assay Workflow
To add multiple assays at a specific position within a workflow, you can now use drag and drop to position them directly at the desired location.

Duplicate Multiple Assays Within a Workflow
You can now duplicate multiple assays within a workflow. The duplicated assays are inserted directly after the last of the selected assays.
This makes it easier to reuse and replicate existing configurations.
 Overall, these enhancements significantly simplify and accelerate the process of building assay workflows.
Deprecation of Predefined Assays
Predefined assays were previously used to quickly create assay workflows.
In recent years, we have moved to a more flexible process based on verified methods, which are delivered independently of heliOS.
Verified methods provide a unified way to create assay workflows and help ensure that your assays are always up to date and compatible with your devices.
As a result, we have decided to deprecate predefined assays in favor of verified methods.
From this release onward, adding predefined assays to a workflow is no longer supported.
Assay workflows that contain predefined assays can still be run, but support for them will be removed in future releases.
Please upgrade your assay workflows to use verified methods so they benefit from the latest and most accurate assay configurations.
Features
- Add new velocity-based conformational change analysis
- Introduce improved process for adding assays to an assay workflow
- Introduce reporting of fit quality issues
- Allow import and export of language documentation versions
- Associate .hos export files with heliOS
- Introduce new .hos export file extension to differentiate heliOS exports from generic .zip files
- Simplify adding devices by automatically detecting available devices
- Enable persisting filter settings in the Methods overview of the Add Assays dialog
- Disable adding legacy assays to workflows
- Add heliOS version information to experiment details
- Enable adding multiple selected assays to workflows
- Add dynamic velocity operation for internal users
- Enable bulk export of documents into a single file
- Enable bulk deletion of documents
- Show warning tab in Experiments view when expired chips were used during a run
- Enable highlighting of expired chips in the device tray
- Enable grouping measurements by chip temperature in Manual Analysis
- Add proper handling for blank measurements to all kinetics fits
- Add proper handling for blank measurements to biphasic kinetics fit with free end level
- Add proper handling for blank measurements to biphasic kinetics fit with free amplitude ratios
- Add proper handling for blank measurements to biphasic kinetics fit
- Add proper handling for blank measurements to monophasic association biphasic dissociation fit with free end level
- Add proper handling for blank measurements to monophasic association biphasic dissociation fit
- Add proper handling for blank measurements to kinetics fit with free end level
- Add proper handling for blank measurements to kinetics fit
- Add proper handling for blank measurements to biphasic association fit
- Add proper handling for blank measurements to association fit
- Enable duplicating multiple assays
- Enable pasting multiline license keys into the license key dialog
- Enable downloading multiple experiments via the context menu
- Enable deleting experiments directly from the device
- Enable editing document metadata via double-clicking the document header
- Rename measurement marker from
RealTimeInteractionCytometrytoInteractionCytometry - Add button in Methods view to open methods in the latest version
- Deactivate assay parameter controls when the underlying assay method is invalid
- Rename blank filter option in blank referencing operation to “Remove Control Blanks”
- Add empirical motion curve fit
- Add fit intersection operation
- Prevent editing parameters when a composite method is read-only
- Improve feedback when connecting to a device fails
Bug Fixes
- Fix rare issue where firmware updates could time out
- Fix rare crash when formatting extremely small numbers
- Fix rare crash during drag-and-drop operations
- Allow editing assay parameters when assay configuration is invalid
- Fix rare issue where tags appeared as black dots after importing methods into an empty database
- Fix issue where side-by-side heliOS installations did not remove desktop shortcut icons during uninstallation
- Fix rare issue where Method script editor did not display parameters or script warnings
- Fix rare issue where Experiments could not run due to script syntax errors
- Fix missing title in certain save dialogs
- Fix issue where changed device IP addresses were not updated in the device list
- Fix method path names not reachable via scrolling in Method Editor
- Fix empty main window after Windows resumes from sleep or hibernate
- Fix error in Automated Analysis when a normalization photo was missing from the Experiment
- Fix heliOS not being displayed correctly in Microsoft Teams
- Fix rare crash after opening live experiment view
- Fix crash when updating an assay
- Fix crash when updating an assay containing a previously closed method
- Fix rare failure in injection jump correction
- Fix rare crash when copying plate plots to clipboard
- Fix duplicated assays not retaining modified names from source assays
- Fix rare issue in Experiment Live View where trace type option disappeared from dropdown menu after selection
- Fix crash when duplicating a method after repositioning the direction parameter
- Fix device sidebar label in Home view
- Fix issue where assay run parameters were not shown when assay descriptions were too long
- Fix issue where new read-only method parameters could not override element parameters
- Fix issue where methods could not be opened
- Fix issue where legends were not updated after recalculating in Kinetics Screening Analysis
- Fix method parameters becoming invalid after removing or replacing elements
- Fix methods becoming invalid after removing elements with overridden parameters causing validation errors
- Fix crash when replacing a method element in a read-only composite method
- Fix issue where required string parameters could crash the system when added to assays
- Fix rare issue where the system crashed after updating an assay
- Fix issue where assay parameters were not visible after updating assay methods to valid versions
- Ensure composite methods remain valid after editing overriding method parameter constraints
- Fix issue where run parameter arguments were lost after updating invalid methods to valid versions
Performance Improvements
- Improve Method and Assay performance
Bug Fixes
General
- Fix rare issue where documents could no longer be saved or opened
Device Control
- Fix a rare issue where a device could not be opened
- Fix rare issue where an experiment could not be downloaded from a device
- Fix long device firmware names overlapping the device control button
- Fix rare issue where device would be connected but remains out-of-sync
Experiments
- Fix rare crash when opening experiment images
Performance Improvements
Analysis
- Slightly reduce time to open saved Analyses
- Improve performance of the outlier removal operation
Assays
- Improve Assay Workflow editor performance
Device Control
- Improve data retention if device connection is lost during experiment download
IMPORTANT: Be sure to update your heliOS to version 2026.2 and heliXcyto firmware with the latest version (v8.5) before updating methods. This can be performed through new heliOS 2026.2 version in the device view (bottom right corner).
HOW to update methods:
- download the newest scIC methods from the DBS website, as a .hos file
- go to Method section in heliOS
- use the Import button on the top and select the downloaded file.
Live view during cell capture
Illumination is enabled during cell capture to allow capture quality control during the live measurement. Illumination does not affect the measurement of traces as it is on only during cell injection. To access the video stream, hover over the “LIVE” view in device control or click the VLC in it to open an external window.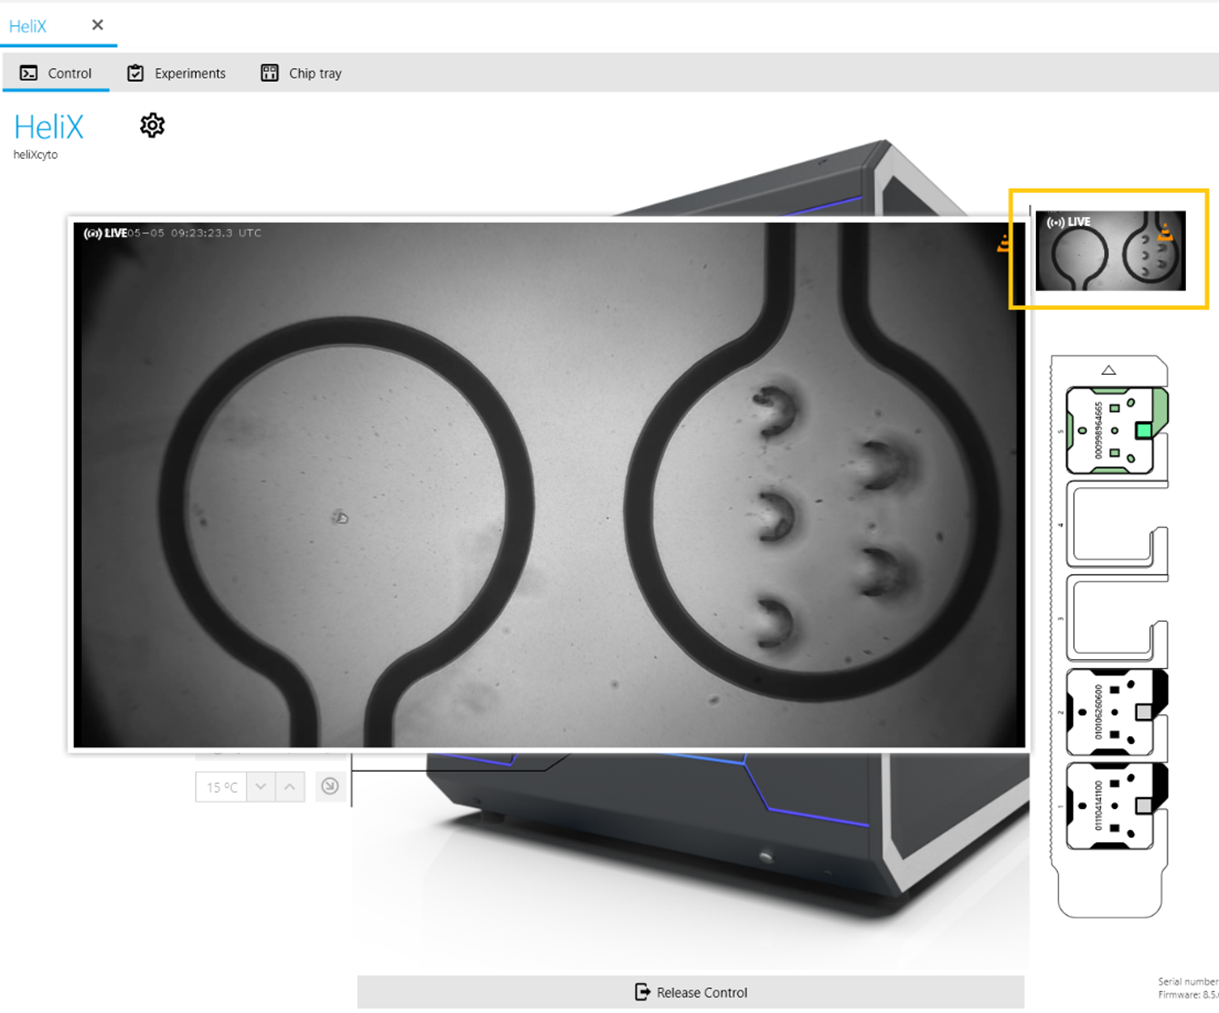
Fluidical improvements
Optimizations made to normalization injection to improve the robustness of peak fluorescence measurement. New dissociation command with faster communication resulting in a more consistent baseline when enabling “Record dissociation washout”. Buffer logic in passivation defaults to “RB 1”, resulting in buffer line 1 to be more consistently “RB 1”.
IMPORTANT: Be sure to update your heliX firmware with the latest version(8.5 or higher) before updating methods. Firmware update can be performed through heliOS in the device view (bottom right corner).
HOW to update methods:
- download the newest switchSENSE methods from the DBS website as a .hos file
- go to Method section in heliOS
- use the Import button on the top and select the downloaded file.
In case you need help, please do not hesitate to contact our support team at support.biosensors@bruker.com
INSTALL INSTRUCTIONS
We recommend to always use the newest versions of heliOS and heliX firmware.
Please update first your heliX device with the latest firmware version before installing a new version of heliOS.
For each new version of heliOS it is mandatory to update the methods.
SYSTEM REQUIREMENTS
Supported Operating System I Windows 10 and higher
heliOS is built on top of .NET and requires the following runtimes to be executed:
| until 2024.1 | .NET 6.0 Desktop Runtime (download links: x64, x86, Arm64) |
| 2024.2 to 2026.1.1 | .NET 8.0 Desktop Runtime (download links: x64, x86, Arm64) |
| 2026.2 or newer | .NET 10.0 Desktop Runtime (download links: x64, x86, Arm64) |
heliOS requires access to a postgreSQL database.
- TIP
Installation of heliOS without .NET Desktop Runtime is possible. When starting heliOS , it will prompt you to download and install the required .NET runtime. If you download the .NET Desktop Runtime through the prompt, the correct version for your system will be selected automatically.
heliX FIRMWARE UPDATE
Note: The installation of a new heliX firmware version must be performed from a computer which is connected to the heliX device.
Note: Skip this step if you are only interested in updating the heliOS version on a computer which is not used to control the heliX device.
- Ensure that the heliX device is switched on and connected to the control PC (directly or via network).
- Download the above listed version of the heliX firmware. We recommend to always use the newest version.
- Run the EXE installer on the control PC and follow the setup steps. You can find the IP address of your heliX in heliOS under Devices.
After approx. 10 minutes the heliX will be restarted and ready to use.
INSTALLATION OF heliOS
Note: If heliOS is installed for the first time on a computer, you first need to install the .NET 8 Desktop Runtime (see Installation of Microsoft .NET 10 Desktop Runtime) and a PostgreSQL database (see Installation and Setup of PostgreSQL Database).
- Download the latest version of heliOS. We recommend always using the newest available version.
- Run the MSI installer and follow the setup instructions.
- Start heliOS.
(If the .NET Desktop Runtime is not installed, you will automatically be prompted to download and install it.) - The first time you open heliOS on a computer, you need to enter your license key via
Settings > License.
Copy and paste the license key into the designated field and confirm. - Configure your PostgreSQL database connection in
Settings > Database.- Enter the
Host(if the database is on the same machine as heliOS:localhost) - Enter the
Databasename (recommended:helios_db) - Enter the database
Username (recommended:helios_user) - Enter the database user
Password(not the PostgreSQL superuser password) - Click
Test Connectionto verify your settings. Once the connection is successful, continue with the setup.
- Enter the
- Confirm your settings.
- You are now ready to use heliOS.
IMPORT OF heliOS METHODS
To install the latest heliOS methods, follow these steps:
- Download the above listed heliOS methods.
- Unzip the downloaded file once. The unzipped folder contains a range of zipped heliOS methods. Do not unzip these files.
Caution | The unzipped folder will contain a range of heliOS methods as.zip-files. Do not unzipthese files! - Open heliOS and go to “Methods”.
- Click on “Import” in the top menu and selectand select the heliOS methods (
.zip-files) you want to install. - Click on
Open(the import may take up to a few minutes). - Your database is equipped with the newest {helios} methods.
IMPORTANT : If custom methods or assays are used, please ensure that the individual building blocks are up-to-date as well by clicking on the clock icon, which will automatically appear when opening them in the Method tab.
INSTALLATION OF MICROSOFT .NET 10
Note: heliOS requires the .NET 10 Desktop Runtime on your Windows operating system. If already installed you can skip this step.
- Download the .NET 10 Desktop Runtime installation file (64-bit version).
- Run the EXE installer and follow the setup steps.
- After the installation process has finished you are ready to install heliOS.
INSTALLATION AND SETUP OF A postgreSQL DATABASE
PostgreSQL Database Setup
heliOS requires a PostgreSQL database to store data in. This section will guide you through the installation of a PostgreSQL database on the same machine as heliOS. It is not needed if:
- a set-up PostgreSQL database is already present, or
- there is a plan to use a PostgreSQL database hosted on a different machine.
| Note | The heliX control computer comes with a preconfigured PostgreSQL database. If you plan to use a PostgreSQL database hosted on a different machine, please consult the PostgreSQL documentation for installation and setup instructions. |
PostgreSQL Database Server Installation
To install a PostgreSQL database on the same machine as heliOS, follow these steps:
- Download the PostgreSQL 17.x database installer from the official download page
- Run the installer and follow the setup steps
- When asked for the components to be installed, deselect the Stack Builder component
- When asked to “provide a password for the database superuser (postgres)” select a secure password
Important This password is required to manage the database but is not used to connect heliOS to the database. Store it securely for future reference! - On the next page, set for the Port a port number that is open on the dedicated machine. The default port is 5432 which is also the default port configured in heliOS. If you want to use a different port than the default one, you have to configure this port in heliOS as well
- Continue with the installation using default settings and finish the setup
Create a User for heliOS
- Open the Windows Run app again (press the WINDOWS+R)
- To create a user named heliOS, enter the following into the field and press OK:
"C:\Program Files\PostgreSQL\17\bin\createuser.exe" -P -U postgres heliOSTip When using a different version of PostgreSQL, replace 17 with the version number of your installation. - When prompted to Enter password for new role, enter a password of your choice and press Enter
Important This password is required to connect heliOS to the database. Store it securely for future reference. - When prompted to Enter it again, re-enter the same password and press Enter
- When prompted for Password, enter the password you chose for the superuser (postgres) (see PostgreSQL Database Server Installation) and press Enter
Create a Database for heliOS
- Open the Windows Run app (press the WINDOWS+R)
- To create a database named heliOS owned by the newly created user heliOS, enter the following into the field and press OK:
"C:\Program Files\PostgreSQL\17\bin\createdb.exe" -U postgres -O heliOS heliOSTip When using a different version of PostgreSQL, replace 17 with the version number of your installation. - When prompted for Password, enter the password you chose for the superuser (postgres) (see PostgreSQL Database Server Installation) and press Enter
In case you need help, please do not hesitate to contact our support team at support.biosensors@bruker.com
Questions?
Contact Us
Our support team is happy to help.