heliX®
Instrument and Chip Handling
To reuse your chip, you simply perform a chip functionalization. This includes two steps: a regeneration and the hybridization of new ligand strands. During the regeneration, all bound analytes and immobilized ligands are removed from the chip surface using the regeneration solution. During the hybridization new ligand strands are hybridized to the anchor strands.
A chip status test gives you important information about the quality of your chip. We recommend performing a chip status test before each assay. The chip test assay performs a regeneration step during which the surface is functionalized with blank Adapter strands, a passivation step and a status measurement. The test yields two important parameters to assess the chip quality:
- Inflection Point: should be in the range of -50 to 400 mV
- Relative Amplitude: should be > 40 %
heliX® Chips are generally robust and long-lasting, if handled and stored under recommended conditions. The chips are equipped with magnets, ensuring the correct insertion into the chip tray as well as securing them in place.
Instructions for heliX® Chip storage and handling:
- Upon receipt, store chips at -20 °C (keeping them in the original packing).
- To increase the chip life time, the DNA nanolevers should be stored in double-stranded form without attached ligand molecules (perform a Chip Test Assay or a Standby Assay)
- The flow channels should be as dry as possible after use. When the chip is ejected from the heliX® instrument, the used flow channels are vented with air for drying. Nevertheless, small droplets of buffer can remain in the flow channel. Therefore, it is advisable to manually purge the used flow channel with compressed air or nitrogen.
- For short term storage, put the dry chip back in the original bag, close it and store it frozen at -20 °C (keep it in the original packing).
- Always wear gloves when handling a chip to avoid contamination of the flow channels and finger prints on the glass surface.
- Please avoid touching the contact pads (golden squares) used for electric connection of the sensor electrodes as this might cause contact issues.
Both assays consist of a chip regeneration (i.e. removal of hybridized ligand strands) and the hybridization of complementary Adapter Strands (Test and Standby solution). The Chip Test additionally contains a chip passivation and provides information on the chip status. Both can be used to prepare the chip for storage.
Yes, that is possible, since the chip surface will be submerged in running buffer after your assay. In between assays, however, we recommend storing the dried chip at -20°C to increase longevity.
If you want to use the instrument after a Clean & Sleep Routine has been performed, you have to perform a Wake Up & Prime routine. This will take approx. 6 minutes and will rinse the fluidic system with buffer. You need a heliX® Maintenance Chip for this step.
We recommend to perform a Clean & Sleep Routine once per week. The heliOS software will automatically remind you when a Clean & Sleep Routine is due. The assay rinses the fluidic system with water to remove residual salt and with 70% ethanol. Afterwards, all tubes are vented with air. The procedure takes approximately 35 minutes and you will need a heliX® Maintenance Chip. Keep in mind, that the instrument cannot be used afterwards until a Wake Up & Prime Routine.
Yes, you can reuse the chip many times! The exact lifetime depends on your specific experimental conditions.
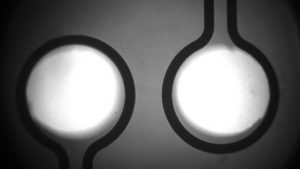
Generally, the software will notify you if your chip is not aligned correctly. The electrode images can additionally give you some information about the alignment. If each excitation light spot fully illuminates one of the two electrodes, the alignment is good. If a larger part of the excitation light spot illuminates an area next to the electrodes, the alignment is not good. See also the exemplary images below.
Bad alignment:


Good alignment:

The heliX+ instrument enables you to switch between different plate formats and sample vial volumes. You simply need to change the format in heliOS: click on the “sample tray” icon in your assay workflow and choose the format in the dropdown menu.