heliX®
General Questions
switchSENSE® is a biophysical research technology to investigate molecular interactions. The core of this technology are DNA nanolevers attached to gold microelectrodes. These DNA nanolevers can easily be customized with any ligand of choice. The orientation of the nanolevers can be controlled by applying voltage to the microelectrodes. We differentiate two measurement modes in switchSENSE® experiments, the dynamic mode and the static mode. In dynamic mode, an alternating voltage is applied, causing the negatively charged DNA nanolevers to oscillate at high frequencies. In static mode, a negative voltage is applied to hold the nanolevers in a static, upright orientation. The nanolevers are additionally equipped with a fluorescent dye. The readout signal of a switchSENSE® experiment is a change in fluorescence intensity. This can be caused by multiple events. For example, the local environment of the dye can change due to e.g. binding of an analyte to the ligand. Furthermore, the gold electrode surface quenches the dye, thus changes in the distance between the dye and the sensor surface will affect the fluorescence intensity. Some assays also include a second fluorescent dye and changes in intensity are caused by Förster resonance energy transfer (FRET) between the two dyes (see Which options do I have for dual-color assays? for details). Based on these measurement modes you can characterize your molecular interactions in great detail, ranging from kinetic rates to conformational changes of binding partners. Find out more about the technical details of switchSENSE® here.
The heliX+ is equipped with 2 lasers and 4 single-photon counters. This allows to collect signals from two different fluorescent dyes for each of the two measurement spots. You have many options to use this for your specific assay requirements:
- Multiplex and measure 4 different binding events in parallel
- Measure 2 different binding events at the same time and at the same sensor spots, e.g. for avidity analyses of bispecific binders
- You can functionalize one measurement spot with two different ligands and additionally adjust the specific density for each of them to mimic the ligand density on the cell surface. This is especially helpful when analyzing for example bispecific antibodies to differentiate between the affinity of the two antibody epitopes and the avidity
- Measure ternary complex formation
- Using the specialized Y-structure DNA nanolevers you can investigate any kind of ternary binding, e.g. PROTACs or molecular glues.
- Measure specific induced conformational changes
- You can exploit the FRET effect to investigate for example aptamer folding or RNA loop formation or any conformational changes with site-specific labels
switchSENSE® is a very versatile technology and offers comprehensive biophysical information. You can measure the following parameters:
Kinetics (association rate kon, dissociation rate koff)
Affinity, Avidity (Kd)
Dose response (EC, IC50)
Multispecific interactions (e.g. bispecific antibodies)
Ternary complex formation / proximity induced binding (e.g. PROTACs)
Conformational changes
Relative changes in protein size
Nucleic acid enzyme binding and activity (kcat, KM)
Your analyte of interest can be anything ranging from small molecules to peptides and proteins and even multispecific binders like antibodies or PROTACs. If you have questions concerning the applicability of your specific analyte, contact our specialists!
Your ligand of interest can be a single-strand RNA or DNA sequence, a double-strand RNA or DNA sequence, an aptamer, a small molecule, a protein or peptide of any desired size, a liposome, a virus-like particle, or whatever else you can think of. If you have questions concerning the applicability of your specific ligand, contact our specialists!
During a measurement in dynamic mode, the DNA nanolevers are switched by applying an alternating voltage to the gold electrode, whereas in static mode they are kept in an upright orientation by a constant negative potential.
- The dynamic mode is usually used to investigate conformational changes.
- The static mode can be used for kinetic measurements as well as the investigation of bispecific binders, protein-protein interactions or enzymatic activity measurements.
Instrument and Chip Handling
To reuse your chip, you simply perform a chip functionalization. This includes two steps: a regeneration and the hybridization of new ligand strands. During the regeneration, all bound analytes and immobilized ligands are removed from the chip surface using the regeneration solution. During the hybridization new ligand strands are hybridized to the anchor strands.
A chip status test gives you important information about the quality of your chip. We recommend performing a chip status test before each assay. The chip test assay performs a regeneration step during which the surface is functionalized with blank Adapter strands, a passivation step and a status measurement. The test yields two important parameters to assess the chip quality:
- Inflection Point: should be in the range of -50 to 400 mV
- Relative Amplitude: should be > 40 %
heliX® Chips are generally robust and long-lasting, if handled and stored under recommended conditions. The chips are equipped with magnets, ensuring the correct insertion into the chip tray as well as securing them in place.
Instructions for heliX® Chip storage and handling:
- Upon receipt, store chips at -20 °C (keeping them in the original packing).
- To increase the chip life time, the DNA nanolevers should be stored in double-stranded form without attached ligand molecules (perform a Chip Test Assay or a Standby Assay)
- The flow channels should be as dry as possible after use. When the chip is ejected from the heliX® instrument, the used flow channels are vented with air for drying. Nevertheless, small droplets of buffer can remain in the flow channel. Therefore, it is advisable to manually purge the used flow channel with compressed air or nitrogen.
- For short term storage, put the dry chip back in the original bag, close it and store it frozen at -20 °C (keep it in the original packing).
- Always wear gloves when handling a chip to avoid contamination of the flow channels and finger prints on the glass surface.
- Please avoid touching the contact pads (golden squares) used for electric connection of the sensor electrodes as this might cause contact issues.
Both assays consist of a chip regeneration (i.e. removal of hybridized ligand strands) and the hybridization of complementary Adapter Strands (Test and Standby solution). The Chip Test additionally contains a chip passivation and provides information on the chip status. Both can be used to prepare the chip for storage.
Yes, that is possible, since the chip surface will be submerged in running buffer after your assay. In between assays, however, we recommend storing the dried chip at -20°C to increase longevity.
If you want to use the instrument after a Clean & Sleep Routine has been performed, you have to perform a Wake Up & Prime routine. This will take approx. 6 minutes and will rinse the fluidic system with buffer. You need a heliX® Maintenance Chip for this step.
We recommend to perform a Clean & Sleep Routine once per week. The heliOS software will automatically remind you when a Clean & Sleep Routine is due. The assay rinses the fluidic system with water to remove residual salt and with 70% ethanol. Afterwards, all tubes are vented with air. The procedure takes approximately 35 minutes and you will need a heliX® Maintenance Chip. Keep in mind, that the instrument cannot be used afterwards until a Wake Up & Prime Routine.
Yes, you can reuse the chip many times! The exact lifetime depends on your specific experimental conditions.
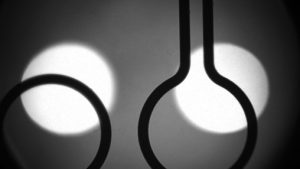
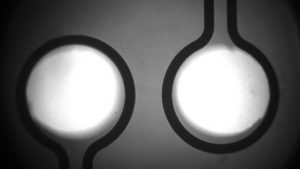
Generally, the software will notify you if your chip is not aligned correctly. The electrode images can additionally give you some information about the alignment. If each excitation light spot fully illuminates one of the two electrodes, the alignment is good. If a larger part of the excitation light spot illuminates an area next to the electrodes, the alignment is not good. See also the exemplary images below.
Bad alignment:

Good alignment:

The heliX+ instrument enables you to switch between different plate formats and sample vial volumes. You simply need to change the format in heliOS: click on the “sample tray” icon in your assay workflow and choose the format in the dropdown menu.
heliOS Software
The purpose of reference-correction, or referencing for short, is to extract the actual binding kinetics signals from the raw fluorescence signals measured by the heliX® device. Referencing aims to remove any artifacts / side effects such as signal drifts, signal jumps, contributions by unspecific binding etc.
The heliX® device is equipped with two spots allowing for simultaneous measurements. One of the two spots may be used for the actual binding kinetics experiment (“measurement spot”) while the other one serves as a ligand-free reference (“reference spot”). In this configuration, the reference spot signal may be used to reference-correct the measurement spot signal in temporal allocation. This is called real-time referencing.
Blank measurements are control measurements without analyte, conducted before, in between or after actual measurements. Real-time referenced blank signals should appear as flat baseline signals. However, small artifacts may remain. In this case, or in the lack of real-time references, blank signals may be subtracted from the measurement signals for a (second-order) reference-correction. This is called blank referencing.
The combination of real-time referencing and blank referencing is referred to as double referencing.
Ideally, one should start with a scientific hypothesis for the model (e.g. “I expect a basic one-to-one binding process.”). This hypothesis is then tested against the data.
If you have no (good) idea about the process, start with the simplest / most confined model and gradually increase model complexity (number of free parameters) until the model shows acceptable agreement with the data. From a mathematical viewpoint, “acceptable agreement” is defined by goodness of fit statistics, e.g. Χ2-based p-value for nonlinear least squares fitting. Keep in mind that the more complex the model the harder to interpret its parameters.
For kinetics signals, for instance, we recommend starting with a complete-dissociation model that forces the signals back to baseline (at infinity). Only allow for remaining offsets (incomplete dissociation) when the strict model fails.
If you double-click on the fit in your analysis, all used mathematical formulas will be displayed.
Experimental Considerations
With a simple dye scouting procedure you can easily identify the most suitable dye for your application in only 2 hours. You use the dye scouting kit and perform the usual steps of ligand preparation, functionalization and a standard kinetic assay with the different dyes in our dye scouting kit. Then you can choose the dye that yielded the highest change in fluorescence for your ligand-analyte pair.
The adapter strands are available with three different red and three different green fluorescent probes. The dyes differ in chemical properties to optimize the signal for your specific application. In general, we recommend to use the dye Ra, since it offers highest stability even throughout long measurement times. To screen for the most sensitive fluorophore for your application you can perform a dye scouting.
The heliX+ chip has two sensor spots and each sensor spot allows for two-color detection, enabling you to simultaneously detect four signals by four single-photon detectors. You can either multiplex four interactions or use one spot for real-time referencing. Please note that the heliX in contrast to the heliX+ only allows for single-color detection.
Yes! You can either functionalize the surface with two different ligands and differentiate between affinity and avidity. Or you can use the specific DNA Y-structure to examine bispecific analytes, ternary complex formation or protein dimerization.
Yes, with a heliX+ you can multiplex up to four interactions due to four single-photon detectors. Two colors can be detected on each of the two sensor spots. And if you want to scale up your throughput, you can combine several heliX+ instruments in one heliOS network.
The heliX+ instruments were designed to fit your specific needs. You can easily scale up your throughput by combining as many heliX+ modules as you require. This modular design offers high versatility – you can combine heliX units in one heliOS network, operate them simultaneously or in parallel. Build your custom high throughput network or ask us for our special offer heliX+ packages.
We know your samples are precious. So we optimized the switchSENSE® technology for minimum sample consumption. You will need approximately 5 pmol ligand per experimental run. Of course, this highly depends on your exact experimental conditions. You can always contact us if you need help with your specific experimental set-up.
Yes, the heliX+ instrument has three different buffer lines. One is used for the maintenance buffer, facilitating standard protocols like functionalization. The other two can be equipped with your individual measurement buffers. The heliOS software has a smart priming feature that remembers the buffer last used for each buffer line and automatically includes a priming step in case the buffer has been changed.
For kinetic experiments, choosing the appropriate flow rate can be a crucial factor for determining the correct affinity. Insufficient flow rates can potentially lead to measurement artifacts. During the association phase, a too slow flow rate can be the cause for mass transport limitation effects. During the dissociation phase an inadequate flow rate can result in re-binding effects. Both these effects should be avoided to obtain high quality kinetic data. Thus, the general rule is to work at high flow rates (> 100 µl/min) whenever the experimental circumstances allow.
It is advisable to use a detergent-free running buffer (e.g. PE40 without Tween-20). Liposomes can for example be immobilized on the chip surface using a cholesterol-ligand, i.e. cholesterol modified DNA nanolever (cholesterol intercalates into lipid bilayer). Use low flow rates for association and dissociation (e.g. < 50 µl/min) to prevent destabilization of membranes.
Yes, you can. And there’s more to it than that. You can even differentiate between the association of DNA/RNA binding enzymes and their catalytic activity and independently examine the effects of inhibitors on these processes.
You can separately adjust the chip tray temperature (i.e. the temperature of your measurement) and the sample tray temperature. This allows you for example to keep your samples cold, but measure at higher temperatures. The chip tray temperature can be adjusted to 15 °C – 40 °C. The temperature range for the sample tray is 4 °C – 40 °C.
Generally, switchSENSE® can tolerate measurements in a variety of complex matrices, including cell lysates and high serum concentrations up to 80 %. Nevertheless, measurements in complex media usually require a certain degree of assay development. In most cases, this is owed to the occurrence of unspecific adsorption to surfaces of the sensor system. For successful experiments, please consider the following aspects:
- Always filter samples or remove solid components by centrifugation prior to injection.
- The addition of non-specific competitor substances (fragmented salmon sperm DNA, polydIdC) is usually required to reduce background affinity.
- When using salmon sperm DNA or similar reagents, make sure to use a well buffered solution to avoid acidification.
- Measurements in static mode are usually more robust when complex media are tested.
- The activity of nucleases that are potentially present in the test solution, is often reduced by EDTA.
- Always perform a reference injection on DNA nanolevers without ligand.
- As complex media usually differ significantly in composition, the ideal dilution of the original sample should be optimized.