heliOS Software
Download 2026.1
This release focuses on performance, robustness, and usability improvements across the application. Key enhancements include faster method and assay loading, stronger parameter validation, clearer identification of invalid assay workflows, expanded kinetics fit results, and more flexible plot customization.
WARNING:
– For each new version of heliOS it is mandatory to update the methods
– The heliOS Methods for scIC version 2026.1 requires to use heliX Firmware version 8.3.6 or higher
– heliOS 2026.1 contains a new advanced method parameter validation which may cause some custom assays to be marked as invalid
– To fix these validation errors, please follow the instructions here
– Starting from heliOS 2025.1, port 2113 is required for communication with heliX instruments. Make sure that the port is not blocked before upgrading.
heliOS
version 2026.1.2
(120 MB)
heliOS Methods
for switchSENSE®
version 2026.1 (14.1 MB)
heliOS Methods
for scIC (formerly RT-IC)
version 2026.1.2 (1.9 MB)
heliX Firmware
version 8.4.0
(1.9 GB)
heliX Firmware Quick Update Guide
Please update your heliX instrument’s firmware to the newest version 8.0+ using heliOS software. If your firmware is still on version 7.X, upgrading to 8.X requires a maintenance visit; please contact customer support.
Update Steps:
- Download the latest firmware from this page.
- Open heliOS , connect to the instrument, request control, and select “Update Firmware” (bottom right) to install the update.
- Once update is installed, restart the heliX instrument via “Reboot Device” in heliOS or manually, then verify the firmware version in heliOS (bottom right).
Caution: Please ensure a stable power connection for the heliX instrument during the update.For more details, please consult the heliX guides or contact customer support.
SYSTEM REQUIREMENTS
Supported Operating System | Windows 10 and higher.
heliOS requires the .NET 8 Desktop Runtime.
heliOS requires access to a postgreSQL database.
→ see install instructions
- RELEASE NOTES - heliOS 2026.1
- CHANGELOG 2026.1
- CHANGELOG 2026.1.1
- CHANGELOG 2026.1.2
- scIC NOTES (formerly RT-IC)
- switchSENSE NOTES
Release Notes
This release focuses on performance, robustness, and usability improvements across the application. Key enhancements include faster method and assay loading, stronger parameter validation, clearer identification of invalid assay workflows, expanded kinetics fit results, and more flexible plot customization.
Improved Method and Assay Loading Performance
Loading methods and assays is now significantly faster. In previous versions, these operations could take considerable time to complete. With this release, we have optimized the loading process, resulting in performance improvements of up to 90%.

Enhanced Parameter Validation
In previous versions, the software automatically estimated the nearest compliant value when a parameter argument or default fell outside its defined constraints. Because this value was not explicitly chosen by the Method editor, its subsequent use in an Assay could lead to unexpected or inconsistent results.
In this release, we introduce comprehensive validation of Method Parameters to prevent these scenarios, ensuring that all parameter inputs meet their constraints before execution.
Editing Parameter Arguments or Defaults
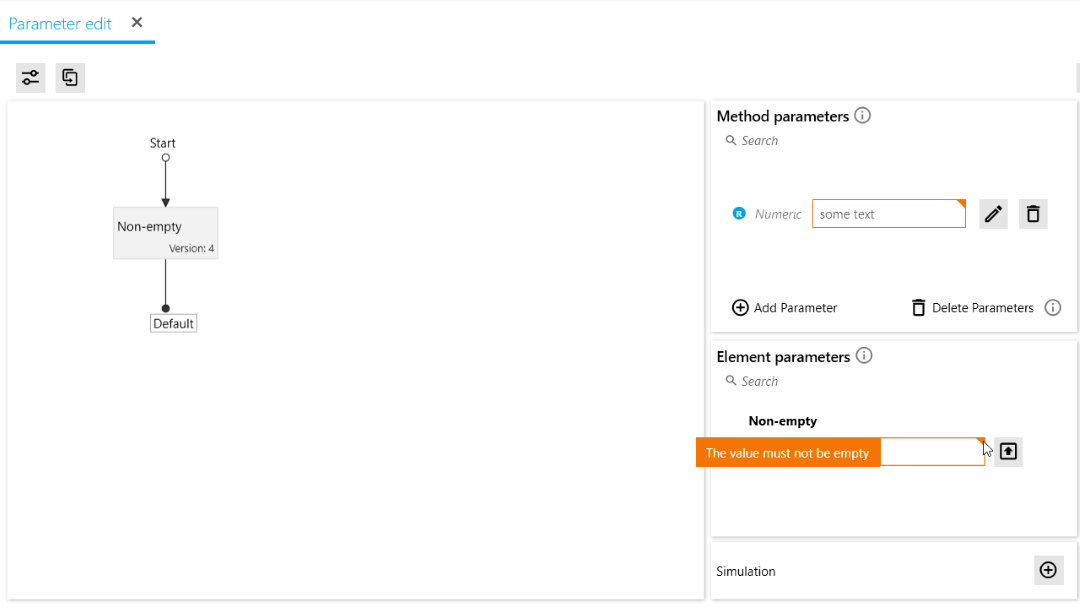
The Method Manager will now prevent invalid arguments from being saved on Element Parameters and invalid defaults from being saved on Method Parameters.
The system uses the constraints defined for each parameter to validate and determine which values are acceptable.
Editing Parameter Constraints
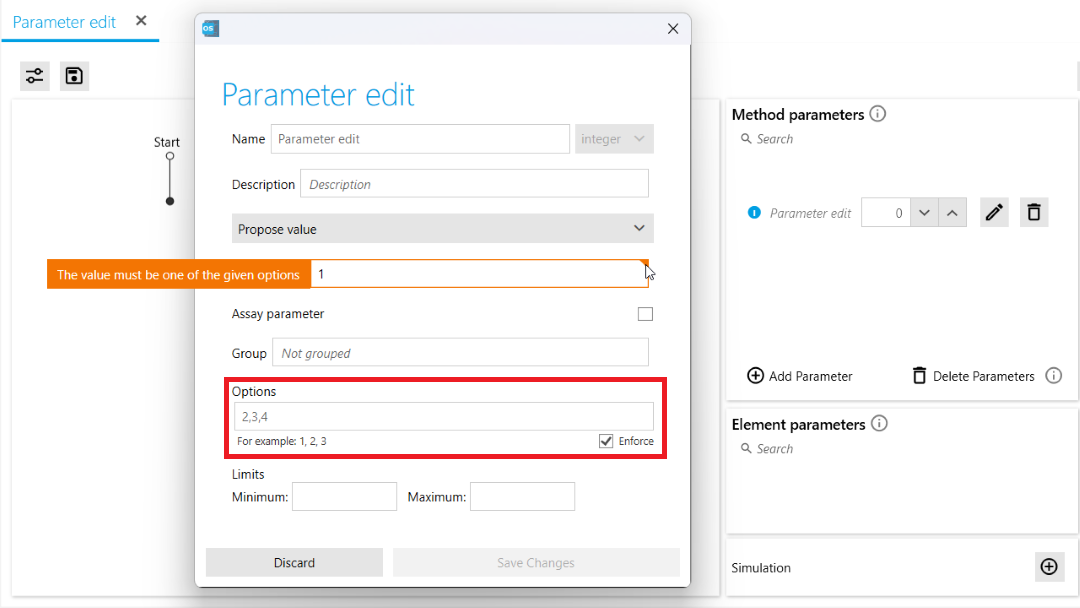
When modifying the constraints for a Method Parameter, the edit dialog now enforces that the default value must conform to the new constraints before the changes can be accepted. This mechanism ensures data validity and prevents the persistence of invalid configurations.
Highlighting Invalid Persisted Data
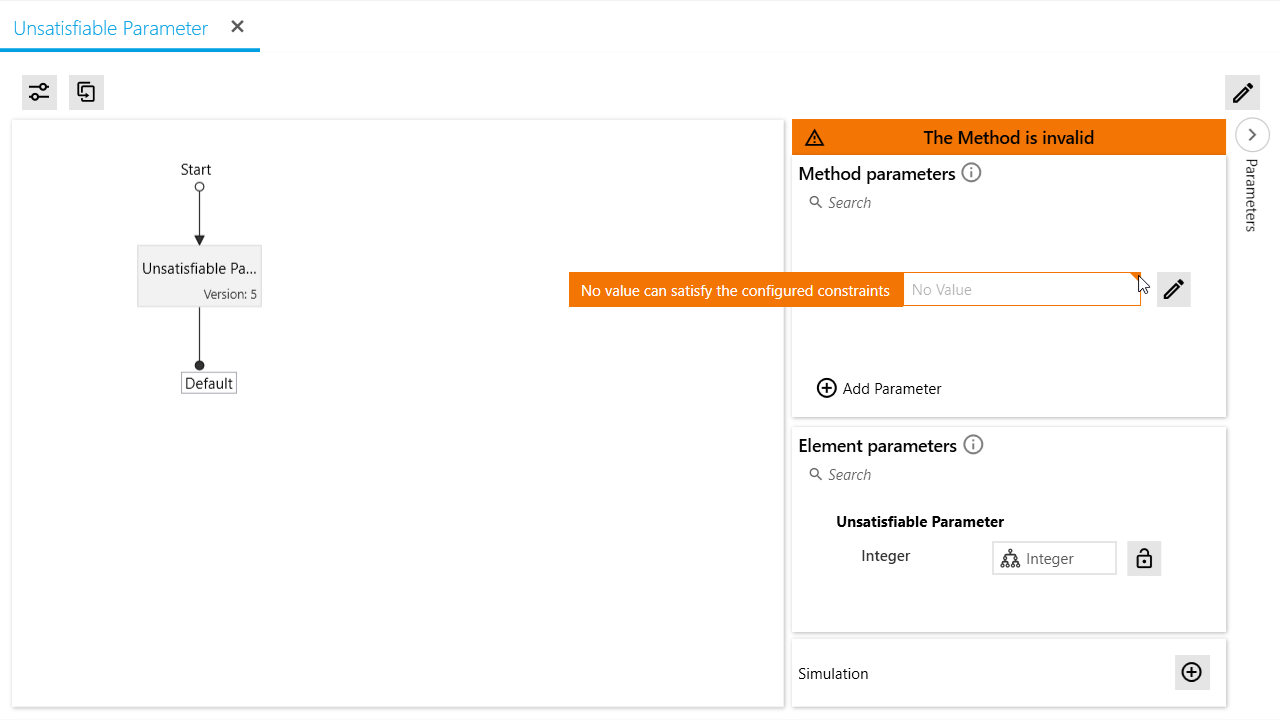
In certain situations, invalid values or constraints might already exist in your persisted data. This can occur due to a lack of validation in previous software versions or by modifying a parameter’s constraints via script after the parameter has been overridden, for instance. When these scenarios arise, the associated Method itself will be marked as invalid.
The example shown above illustrates an unsatisfiable parameter scenario: the method parameter is set to only accept values between 1 and 5. It overrides the “Integer” parameter which only accepts values between 6 and 10. The 1-5 and 6-10 limitations do not overlap, therefore, no value can satisfy the method parameter.
Additionally, for some parameters with invalid values heliOS may be able to determine the intended value. In this case, heliOS will prompt you to “Click to fix”.
Simply click the “Click to fix” label, and heliOS will fix the parameter automatically.
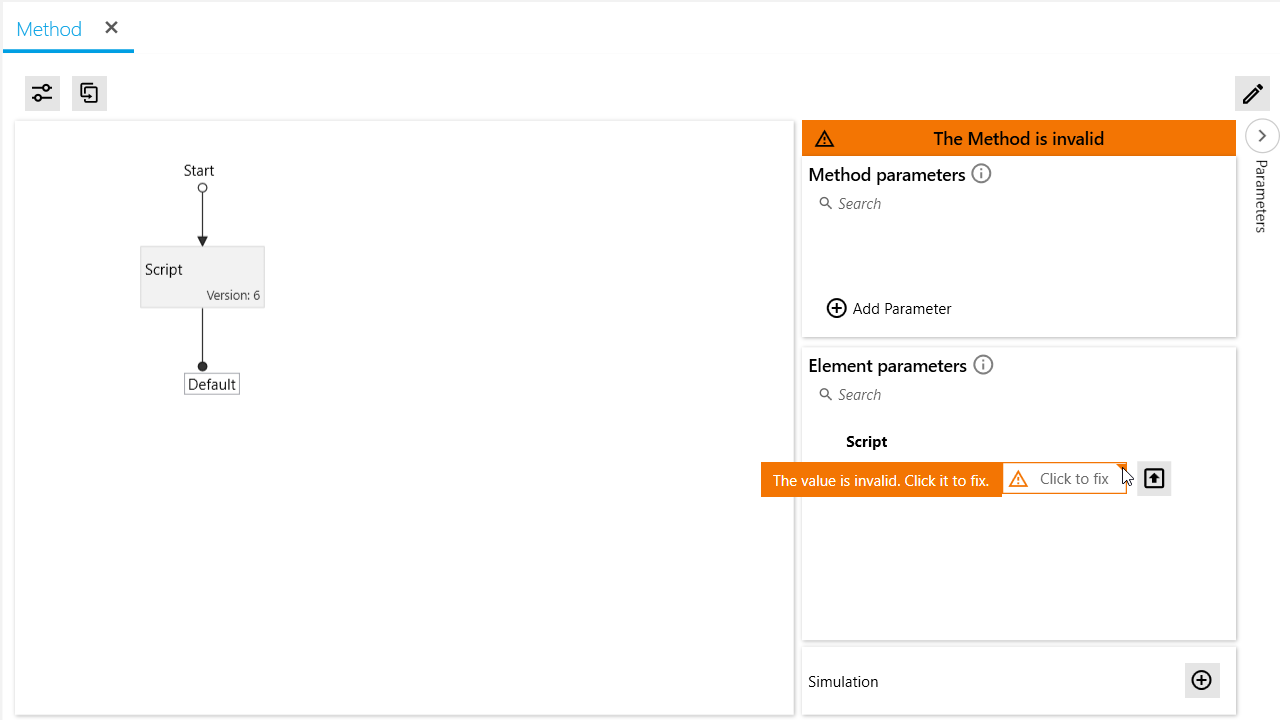
Invalid Method Elements
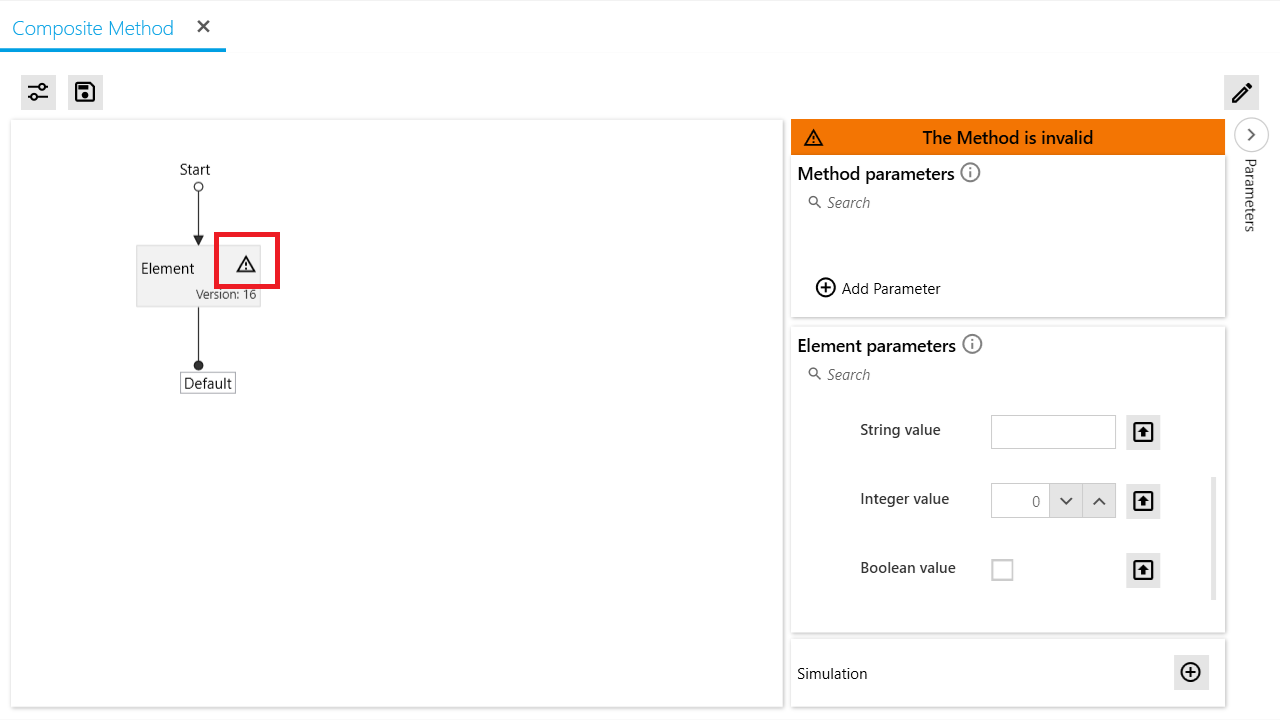
If an element within a Composite Method is invalid, the Composite Method itself will be invalid. The problematic element can be identified by the warning icon (see screenshot).
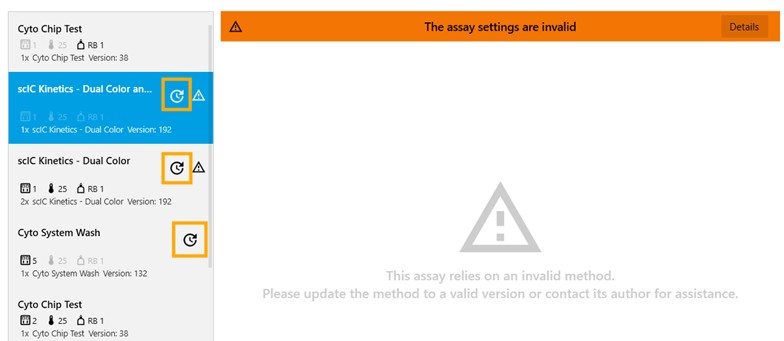
Enabled Indication of Invalid Assay Workflow
In previous releases, if an underlying method contained a parameter argument or default value that did not meet the defined constraint, the system generated an assay using an automatically estimated compliant value, and allowed the assay workflow to start despite the mismatch.
With this release’s enhanced Parameter Validation, methods no longer adjust the values automatically, ensuring the assays are set up and executed as intended by the user. If a method contains invalid default values or arguments, the system will clearly flag the issue and prevent the assay workflow from starting. The Run Assay Worfklow button is automatically disabled in these cases, along with a indicator pointing to the method that requires attention.

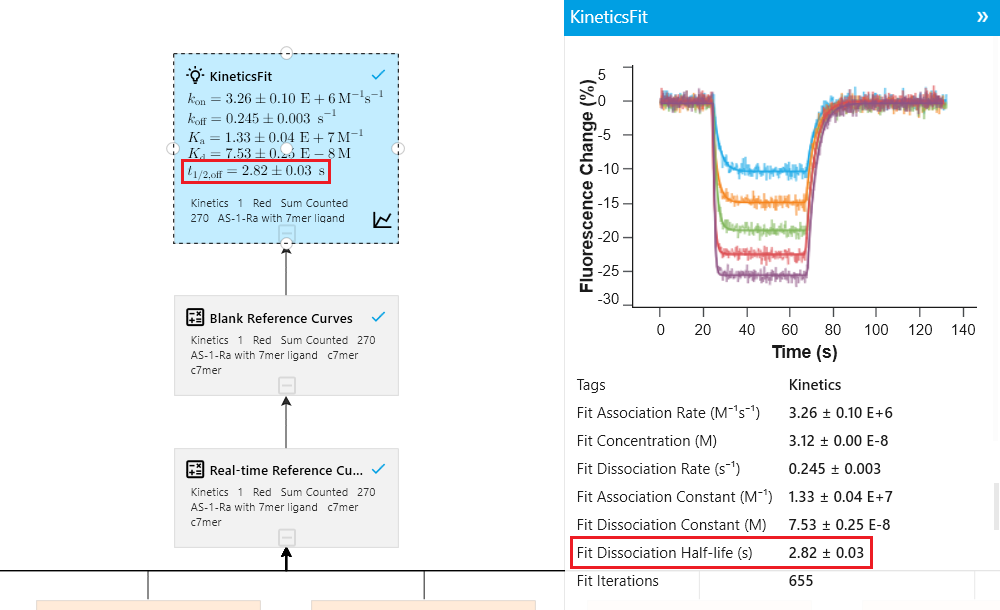
Extended Kinetics Fit Results
Previously, kinetics fit results reported only the optimized rate constants, without the corresponding time constants. In this release, based on user feedback, we have expanded the output to include dissociation half-live(s). This improvement makes the information directly accessible, eliminating the need for users to perform additional calculations.
Improved plot customization
Effective with this release, plot customization is more intuitive to use with easier access to existing configuration options. The Edit Property functionality is more prominently available, allowing quicker adjustments to plot parameters. In addition, an expanded palette of color options allows you to customize series color more precisely.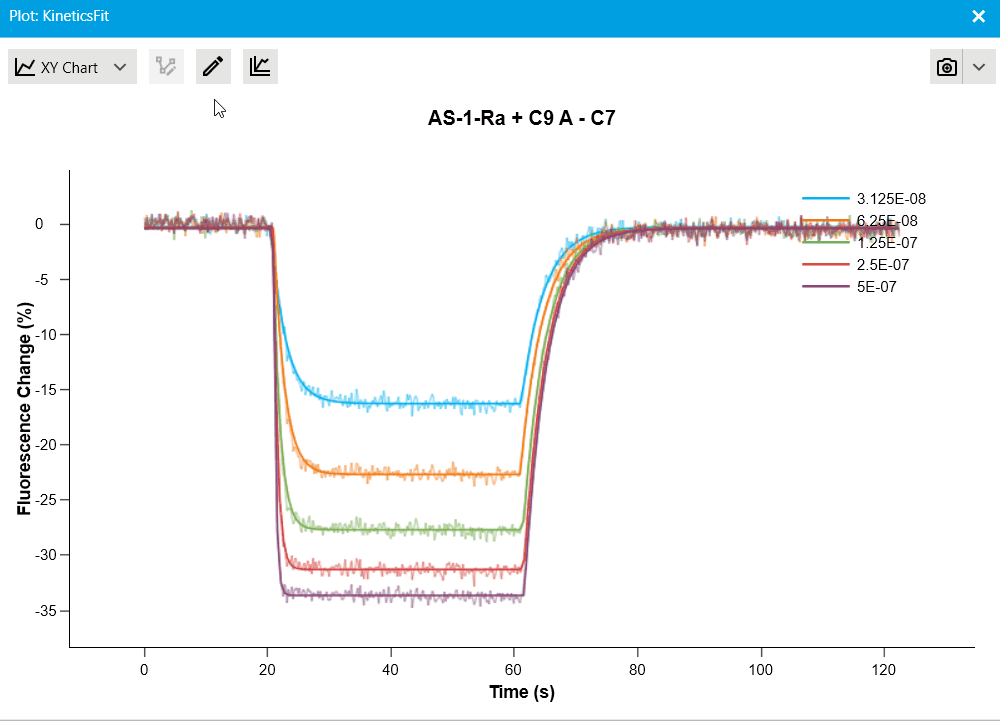
Changelog
Features
-
Analysis:
- Improve initialization of monophasic kinetics fits in slow dissociation scenarios
- Add dissociation half-life(s) as derived parameter(s) to all kinetics fits parametrized by dissociation rate(s)
-
Automatic Analysis:
- Hide effectless blank referencing parameter in substrate titration analysis
- Optimize size of scIC microscope images in automated analyses
-
Manual Analysis:
- Add more colors option for color property in series properties
- Show plot based parameter editors in fullscreen mode
- Remove all collapsed elements of a parent element when deleting the parent element in scratchpad of an analysis
- Add empirical motion curve fit
- Add fit intersection operation
-
Device Control:
- Enable service tools scripts with advanced device license
- Add service tools Cyto chip focus test and LED gradient test
- Add support for deleting device snapshots via CTRL+ALT+D from device overview
- Improve error message shown when device port is not accessible
- Increase default connection timeout to 15 seconds, and default heartbeat timeout to 30 seconds
-
Assays:
- Prevent using an assay when its underlying method is invalid
- Deactivate parameter controls in assays when underlying assay method is invalid
-
Methods:
- Add validation for parameters within composite methods
- Enable resizing height of composite method parameters list
- Prevent editing parameters when composite method is read-only
- Add button in methods to enable opening these methods in latest version
-
General:
- Extend warning about snapshot deletion to clarify consequences
- Add option to completely disable logging
- Add support for new System Wash Chip
Bug Fixes
-
Analysis:
- Fix names and symbols of enzymatic activity fit parameters
- Fix injection-jump correction not applying carryover to jump-free curves
- Fix rare issue of fluorescence datapoint being loaded out of order into an analysis
- Fix injection-jump correction failure for curves with disordered time coordinates
- Fix issue where rate map plot was disabled for kinetic fit results
- Fix automated injection-jump correction failing in edge cases of extreme injection offsets and spikes close to the injection
-
Automatic Analysis:
- Fix buttons for scIC snapshots not always shown when hovering over snapshots
- Fix issue where legend was not updated after recalulating in Kinetics Screening Analysis
-
Manual Analysis:
- Fix crash when confirming extract data operation settings without any data attached
- Fix rare system freeze when deleting an analysis element while its plot being loaded
- Resolve rare crash caused by invalid data in clipboard while working on an analysis
- Fix a rare crash when visualizing a fit with invalid parameter values
- Fix rare crash when editing analysis parameters without data source
- Fix rare crash when editing mask positions for failed outlier removal operation
-
Device Control:
- Fix rare case of device incorrectly entering error state
- Fix crash when encountering unknown device type
- Fix a rare issue where the connection was lost while controlling a device
- Prevent showing the “Read connection was closed” message when closing the connection in the Assay Start Wizard
-
Experiments
- Provide appropriate message when experiment loading from snapshot fails
-
Assays:
- Fix heliOS crash when providing invalid values in generate series dialog within assay
- Fix rare heliOS crash after closing series generator dialog for a run parameter and updating the assay
- Fix issue set run parameters not applied in assay script
- Fix rare crash when adding a method to an assay workflow
- Fix rare crash while opening and closing start wizard dialog in assay workflow
- Fix issue where assay run parameters not shown in case of long assay description
-
Methods:
- Fix rare issue updating parameter default value in script overrides the set user value in composite method
- Fix issue where heliOS crashes when setting the minimum and maximum of a numerical method parameter to empty, while editing it in a composite method
- Fix issue where heliOS crashes when setting the minimum and maximum of a numerical parameter to empty, while exposing it in a composite method
- Fix rare heliOS crash when changing method script
- Fix issue where defining modification property of a liquid as nullable string without setting default value showed an error in script editor
- Prevent overriding element parameter by method parameter with non matching options
- Fix false liquid volume predictions when defining liquids within if else clauses
- Resolve unexecuted liquid definitions with empty string
- Show validation error when using commas for parameter values
- Fix a crash when replacing a method element in a read-only composite method
- Fix a script syntax error when using quotes in an analysis section name
- Fix crash when trying to add a method to a read-only composite method
-
General:
- Fix rare heliOS crash when copying plot to clipboard
- Enable report feedback button and issue report functionality
- Fix a rare crash when losing a database connection
- Fix rare issue heliOS crashes due to document tag filter
- Fix plot title cannot be cleared
Performance Improvements
- Assay:
- Improve the loading speed of methods and assays
Changelog
Bug Fixes
-
Fix rare issue in experiment live view that trace type option disappears from drop-down menu when selected
-
Fix a crash when duplicating a method after repositioning the direction parameter
Changelog
Bug Fixes
-
Fix crash when updating an assay containing previously closed method
-
Fix crash when updating an assay
- Fix rare crash when copying plate plot to clipboard
IMPORTANT: Be sure to update your heliXcyto firmware with the latest version before updating methods. This can be performed through new heliOS 2026.1 version in the device view (bottom right corner).
HOW to update methods:
- download the newest scIC methods from the DBS website
- go to Method section in heliOS
- use the Import button on the top and select the (entire) downloaded zip file
Please note that, when opening old Assay workflow in new HeliOS version 2026.1, assay components need to be updated by pressing the circle arrow icon. After updating your workflow, assay view might not show correctly. In this case, please close the assay workflow and open it again.
New improved fluidics commands
scIC methods have been updated to use more optimized injection commands. Main difference for customer is slightly increased cell and analyte volumes (approximately 5µl per run). Updates to injections can bring slight improvements to cell capture and stability, as well as the association injection quality.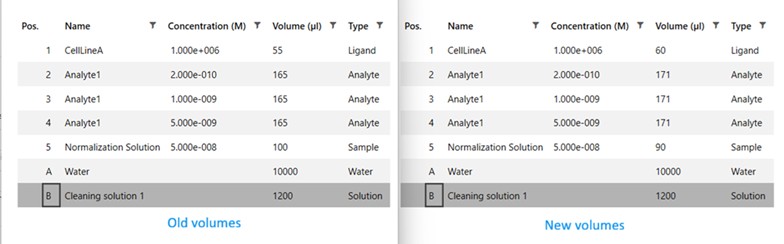
HOW to update methods:
- download the newest switchSENSE methods from the DBS website
- go to Method section in heliOS
- use the Import button on the top and select the (entire) downloaded zip file
Enhancements: Origami Conformational Change Methods
We have significantly improved the origami conformational change methods to:
- Increase chip lifetime for extended usability.
- Enhance measurement reproducibility for more consistent and reliable results.
Deprecation Notice: Adapter Sizing Methods
Starting with version 2026.1, adapter sizing methods are no longer supported.
Please transition to the origami conformational change assay setup, which offers superior performance and reliability.
In case you need help, please do not hesitate to contact our support team at support@dynamic-biosensors.com.
INSTALL INSTRUCTIONS
We recommend to always use the newest versions of heliOS and heliX firmware.
Please update first your heliX device with the latest firmware version before installing a new version of heliOS.
For each new version of heliOS it is mandatory to update the methods.
SYSTEM REQUIREMENTS
Supported Operating System I Windows 10 and higher
heliOS is built on top of .NET and requires the following runtimes to be executed:
| until 2024.1 | .NET 6.0 Desktop Runtime (download links: x64, x86, Arm64) |
| 2024.2 or newer | .NET 8.0 Desktop Runtime (download links: x64, x86, Arm64) |
heliOS requires access to a postgreSQL database.
- TIP
Installation of heliOS without .NET Desktop Runtime is possible. When starting heliOS , it will prompt you to download and install the required .NET runtime. If you download the .NET Desktop Runtime through the prompt, the correct version for your system will be selected automatically.
heliX FIRMWARE UPDATE
Note: The installation of a new heliX firmware version must be performed from a computer which is connected to the heliX device.
Note: Skip this step if you are only interested in updating the heliOS version on a computer which is not used to control the heliX device.
- Ensure that the heliX device is switched on and connected to the control PC (directly or via network).
- Download the above listed version of the heliX firmware. We recommend to always use the newest version.
- Run the EXE installer on the control PC and follow the setup steps. You can find the IP address of your heliX in heliOS under Devices.
After approx. 10 minutes the heliX will be restarted and ready to use.
INSTALLATION OF heliOS
Note: If heliOS is installed for the first time on a computer you need to first install the .NET 8 Desktop Runtime (see Installation of Microsoft .NET 8) and a PostgreSQL database (see Installation and setup of postgreSQL database).
- Download the above listed version of heliOS. We recommend to always use the newest version.
- Run the MSI installer and follow the setup steps.
- Start heliOS ( if .NET Desktop Runtime is not installed, you will be prompted to download and install it)
- The first time you open heliOS on a computer you need to enter your license key (Settings → License).
Copy and paste the license key into the intended input field and confirm. -
Configure your {postgresql} database connection in
Settings > Database-
Enter the
Host(if the database is on the same machine as heliOS:localhost) -
Enter the
Databasename (if you followed Create a User for heliOS :{helios-database-recommended-name}) -
Enter the database
Username (if you followed Create a User for heliOS:{helios-database-recommended-username}) -
Enter the database user
Password(not the superuser password) -
Press
Test Connectionto test your settings, once successful, continue
-
- Confirm your settings
- You are ready to use heliOS
IMPORT OF heliOS METHODS
To install the latest heliOS methods, follow these steps:
- Download the above listed heliOS methods.
- Unzip the downloaded file once. The unzipped folder contains a range of zipped heliOS methods. Do not unzip these files.
Caution | The unzipped folder will contain a range of heliOS methods as.zip-files. Do not unzipthese files! - Open heliOS and go to “Methods”.
- Click on “Import” in the top menu and selectand select the heliOS methods (
.zip-files) you want to install. - Click on
Open(the import may take up to a few minutes). - Your database is equipped with the newest {helios} methods.
IMPORTANT : If custom methods or assays are used, please ensure that the individual building blocks are up-to-date as well by clicking on the clock icon, which will automatically appear when opening them in the Method tab.
INSTALLATION OF MICROSOFT .NET 8
Note: heliOS requires the .NET 8 Desktop Runtime on your Windows operating system. If already installed you can skip this step.
- Download the .NET 8 Desktop Runtime installation file (64-bit version).
- Run the EXE installer and follow the setup steps.
- After the installation process has finished you are ready to install heliOS.
INSTALLATION AND SETUP OF A postgreSQL DATABASE
PostgreSQL Database Setup
heliOS requires a PostgreSQL database to store data in. This section will guide you through the installation of a PostgreSQL database on the same machine as heliOS. It is not needed if:
- a set-up PostgreSQL database is already present, or
- there is a plan to use a PostgreSQL database hosted on a different machine.
| Note | The heliX control computer comes with a preconfigured PostgreSQL database. If you plan to use a PostgreSQL database hosted on a different machine, please consult the PostgreSQL documentation for installation and setup instructions. |
PostgreSQL Database Server Installation
To install a PostgreSQL database on the same machine as heliOS, follow these steps:
- Download the PostgreSQL 17.x database installer from the official download page
- Run the installer and follow the setup steps
- When asked for the components to be installed, deselect the Stack Builder component
- When asked to “provide a password for the database superuser (postgres)” select a secure password
Important This password is required to manage the database but is not used to connect heliOS to the database. Store it securely for future reference! - On the next page, set for the Port a port number that is open on the dedicated machine. The default port is 5432 which is also the default port configured in heliOS. If you want to use a different port than the default one, you have to configure this port in heliOS as well
- Continue with the installation using default settings and finish the setup
Create a User for heliOS
- Open the Windows Run app again (press the WINDOWS+R)
- To create a user named heliOS, enter the following into the field and press OK:
"C:\Program Files\PostgreSQL\17\bin\createuser.exe" -P -U postgres heliOSTip When using a different version of PostgreSQL, replace 17 with the version number of your installation. - When prompted to Enter password for new role, enter a password of your choice and press Enter
Important This password is required to connect heliOS to the database. Store it securely for future reference. - When prompted to Enter it again, re-enter the same password and press Enter
- When prompted for Password, enter the password you chose for the superuser (postgres) (see PostgreSQL Database Server Installation) and press Enter
Create a Database for heliOS
- Open the Windows Run app (press the WINDOWS+R)
- To create a database named heliOS owned by the newly created user heliOS, enter the following into the field and press OK:
"C:\Program Files\PostgreSQL\17\bin\createdb.exe" -U postgres -O heliOS heliOSTip When using a different version of PostgreSQL, replace 17 with the version number of your installation. - When prompted for Password, enter the password you chose for the superuser (postgres) (see PostgreSQL Database Server Installation) and press Enter
In case you need help, please do not hesitate to contact our support team at support.biosensors@bruker.com
Questions?
Contact Us
Our support team is happy to help.