heliOS Software
Download 2023.1
We are excited to announce heliOS 2023.1.
After the launch of our new RT-IC technology, heliOS 2023.1 brings new features to expand its support for RT-IC assays. The overview for the RT-IC analysis has been improved, and two new RT-IC focused operations have been added to the manual analysis. Furthermore, we are introducing value generators to accelerate the configuration of custom assays. The added value generators represent the first step towards expanding the usability of custom assays.
As usual, this release includes improvements, which aim to increase the usability of heliOS.
heliOS
version 2023.1.2
(123 MB)
heliOS Methods
for switchSENSE®
version 2023.1 (9 MB)
heliOS Methods
for RT-IC
version 2023.1 (0.8 MB)
heliX Firmware
version 6.311.3.1977
(1.5 GB)
heliX Quick Start
Guide
version 7.1 (2.5 MB)
Note: Before running a new heliOS version, a firmware update of your heliX or heliXcyto device is necessary.
SYSTEM REQUIREMENTS
Supported Operating System I Windows 10
heliOS requires the .NET 6 Desktop Runtime.
heliOS requires access to a postgreSQL database.
→ see install instructions
We are excited to announce heliOS 2023.1.
After the launch of our new RT-IC technology, heliOS 2023.1 brings new features to expand its support for RT-IC assays. The overview for the RT-IC analysis has been improved, and two new RT-IC focused operations have been added to the manual analysis.
Furthermore, we are introducing value generators to accelerate the configuration of custom assays. The added value generators represent the first step towards expanding the usability of custom assays.
As usual, this release includes improvements, which aim to increase the usability of heliOS.
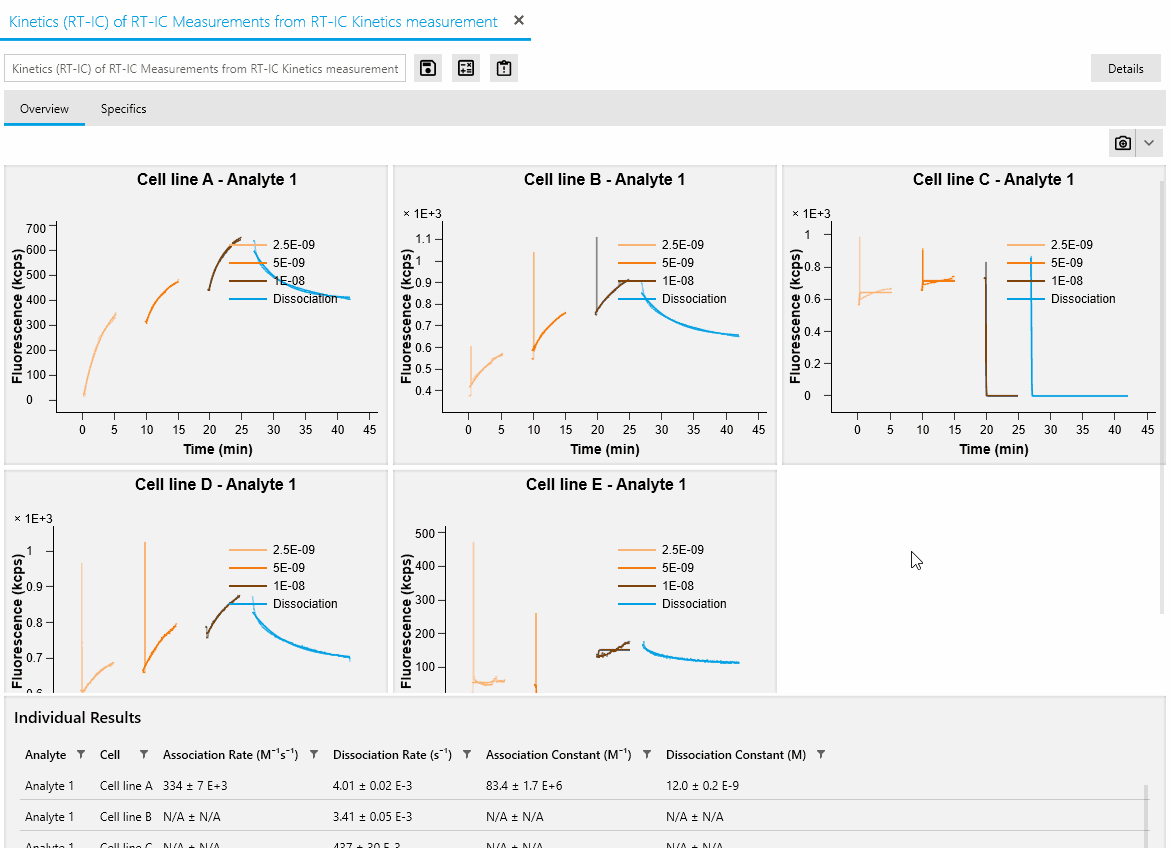
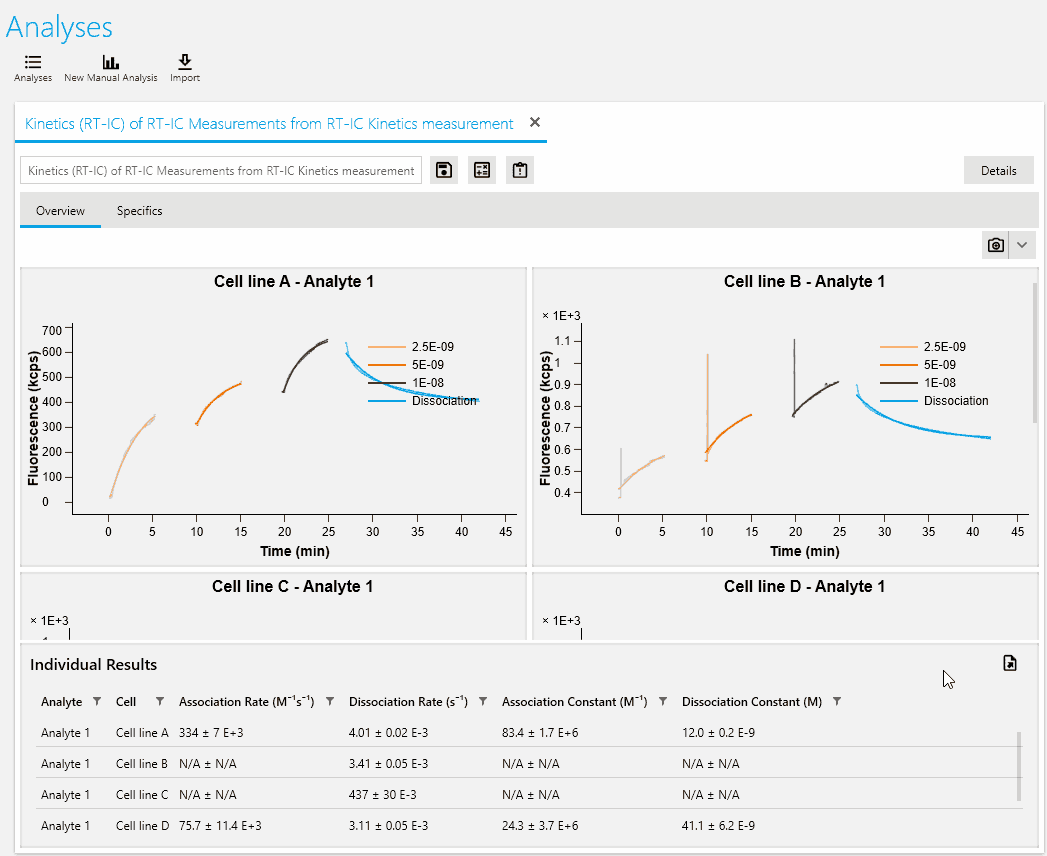
RT-IC automated analyses
Each Kinetics Analysis within the “Specifics” tab now contains a button that enables the “Quality Control View”. The “Quality Control View” provides access to the raw calibration data as well as a plot of the analyzed data in its raw, normalized, and referenced state.
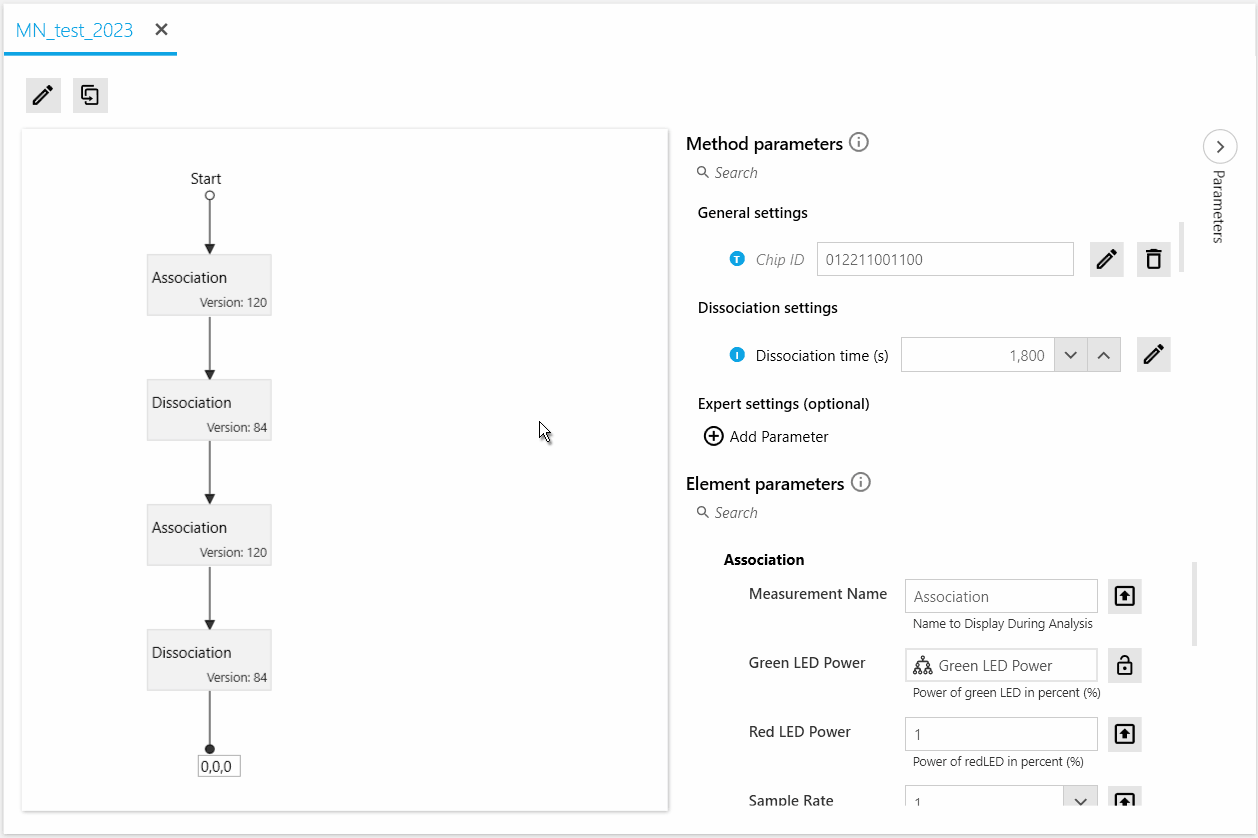
Composed Methods
To simplify the maintenance of composed methods with many parameters, we added search bars to filter method and element parameters effectively. Furthermore, selecting elements within a composed method hides the parameters of unselected elements.
To easier identify the composed method’s element a parameter belongs to, hovering over a parameter now highlights its element.
Assay run generators
It is now easier to create custom assays with run containing parameter value patterns. Particularly, generating concentration series with blanks is now significantly easier. For this, new commands are available within the header of each column of the parameter table.
To generate a concentration series, you can use the “Overwrite runs” command, which will open a dialog within which you can specify the maximum concentration, a division factor, and the number and order of concentrations to generate.
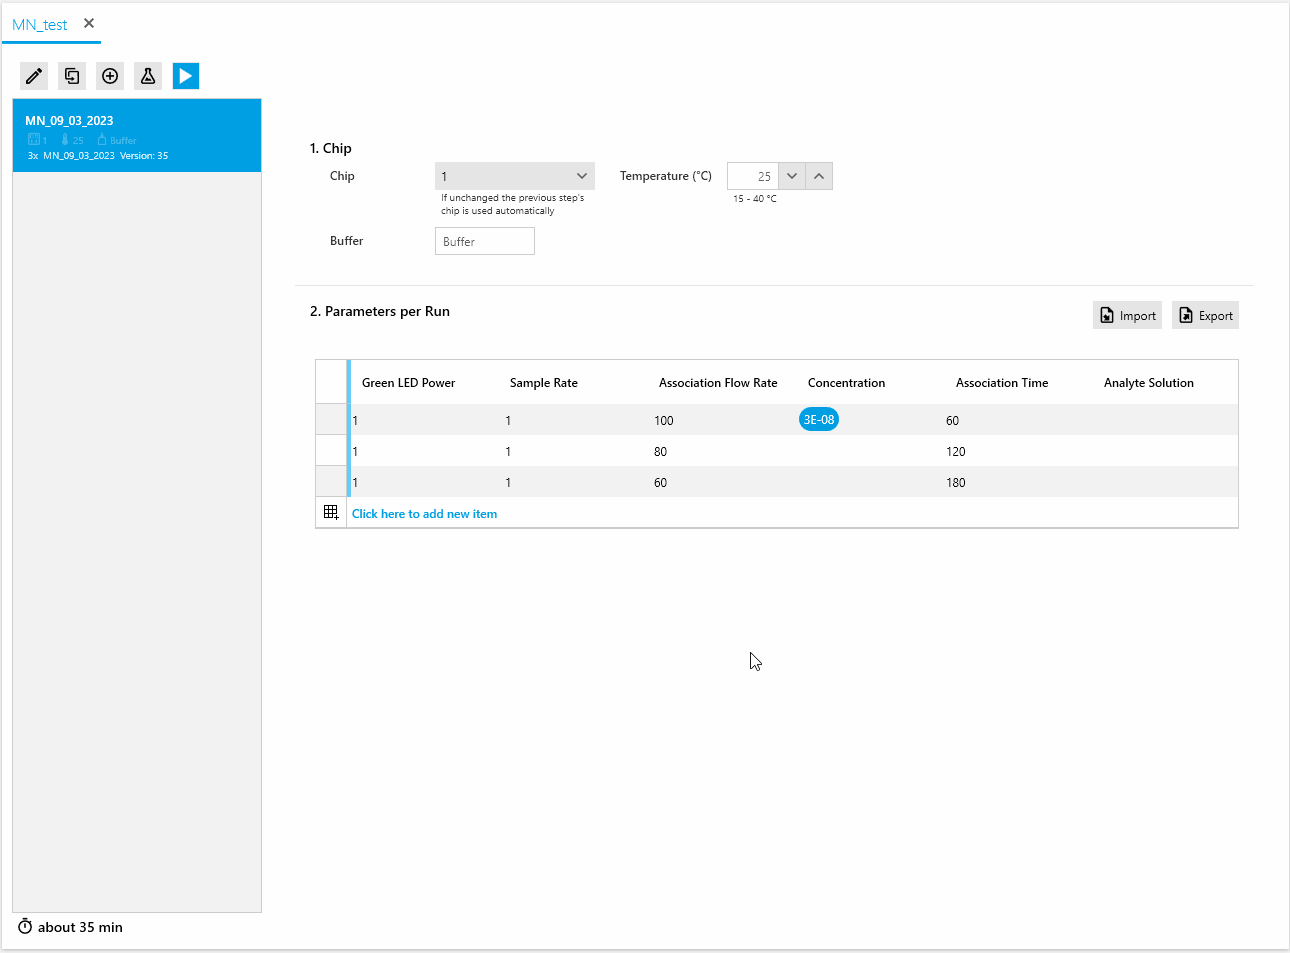
!CAUTION! — generating a concentration series will replace all existing runs with the newly generated series. Please consider using it before setting up any other runs within your assay.
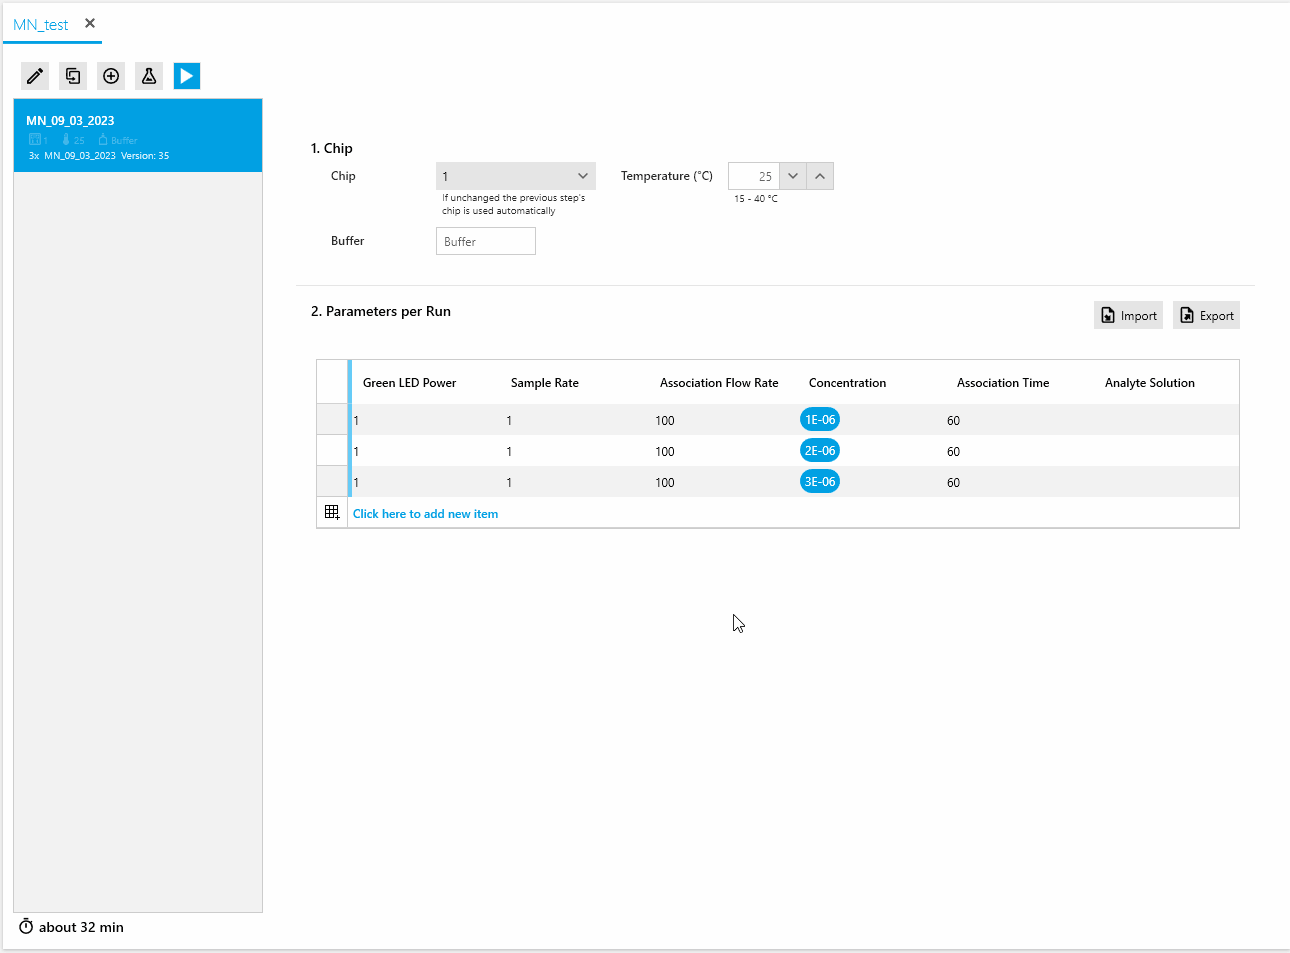
After the concentration series, we can add blanks using the “Add runs” command. The dialog for adding runs requires a constant value and a specification to determine where the new runs are to be added with respect to the already existing runs.
Plot improvements
It is now easier to select multiple curves from the plot legend using the [CTRL] key to select multiple traces or the [SHIFT] key to select a whole range. Use this to create gradients or uniformly colored traces with ease.
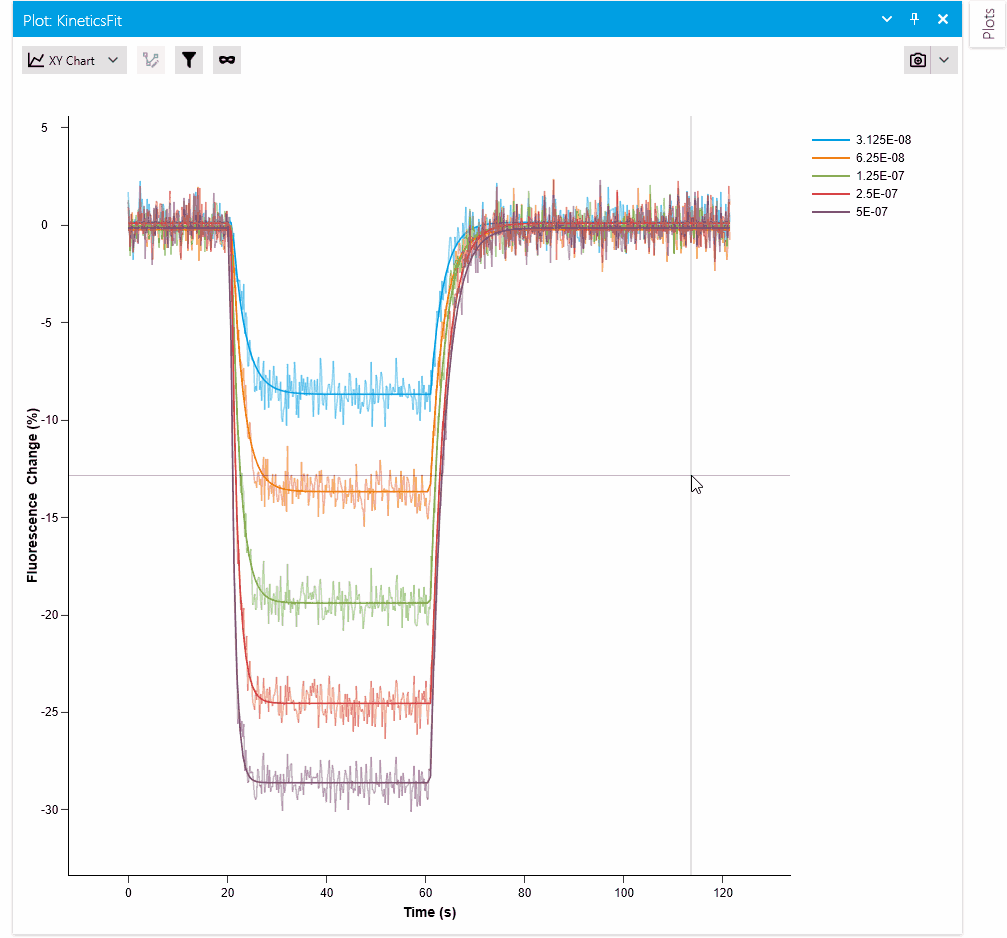
Especially relevant for RT-IC applications, you can now directly jump from a plot to the images that were recorded within the timeframe of the displayed traces. Use the context menu option “Show related images” to jump to the images of the experiment. The images are automatically filtered to the timeframe of the plotted data. To remove the filter, click on the “Filtered” indicator on the top left.
Manual analyses operations
We have introduced two new operations to the manual analysis, “Order curves” and “Jump Removal“.
“Order curves” is our newest “Standard Operation” that can be used to sort curves by any metadata entry. The curves may be sorted in ascending or descending order.
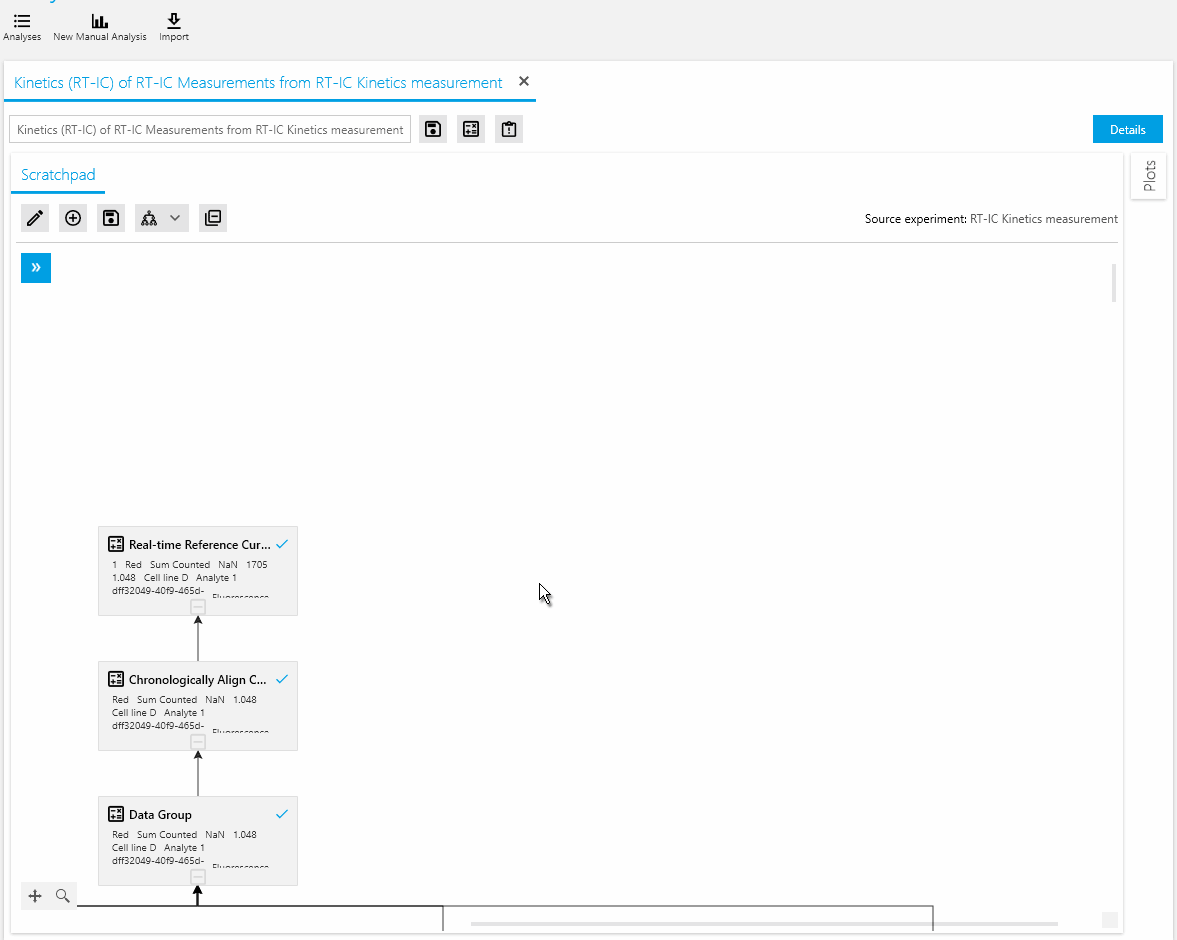
“Jump removal” is our newest “Smart Operation”. It was particularly designed to remove jump artifacts from traces recorded during RT-IC measurement. To remove a jump, you need to determine the index of the point before the jump and provide the index (or indexes, if multiple jumps are to be removed) to the corresponding curve (curves are displayed top to bottom chronologically).
The jump(s) can be removed in two ways, “Absolute” or “Relative”. The selection depends on the suspected source of the jump. If the jump is due to a static fluorescence source (e.g., a fluorescence dust particle), the “Absolute” mode is appropriate. If the jump is suspected to origin from additional active binding sites (e.g., an additional cell), the “Relative” mode must be selected.
The jump removal may also be applied to subsequent measurements within the same analysis pipeline. For this set, the “Carryover Mode” to “Carryover”. In this mode, the jump removal is forwarded to subsequent curves, ensuring a consistency throughout the analyzed dataset.
Features
- Added the ability to search and filter parameters when designing composed methods
- Added highlighting for elements within a composed method when hovering over their parameters.
- Added run generators for easier custom assay setups
- Increased dead volume of 10 ml glass vial from 500 to 700 µl
- Added a dedicated row for images in the experiment timeline
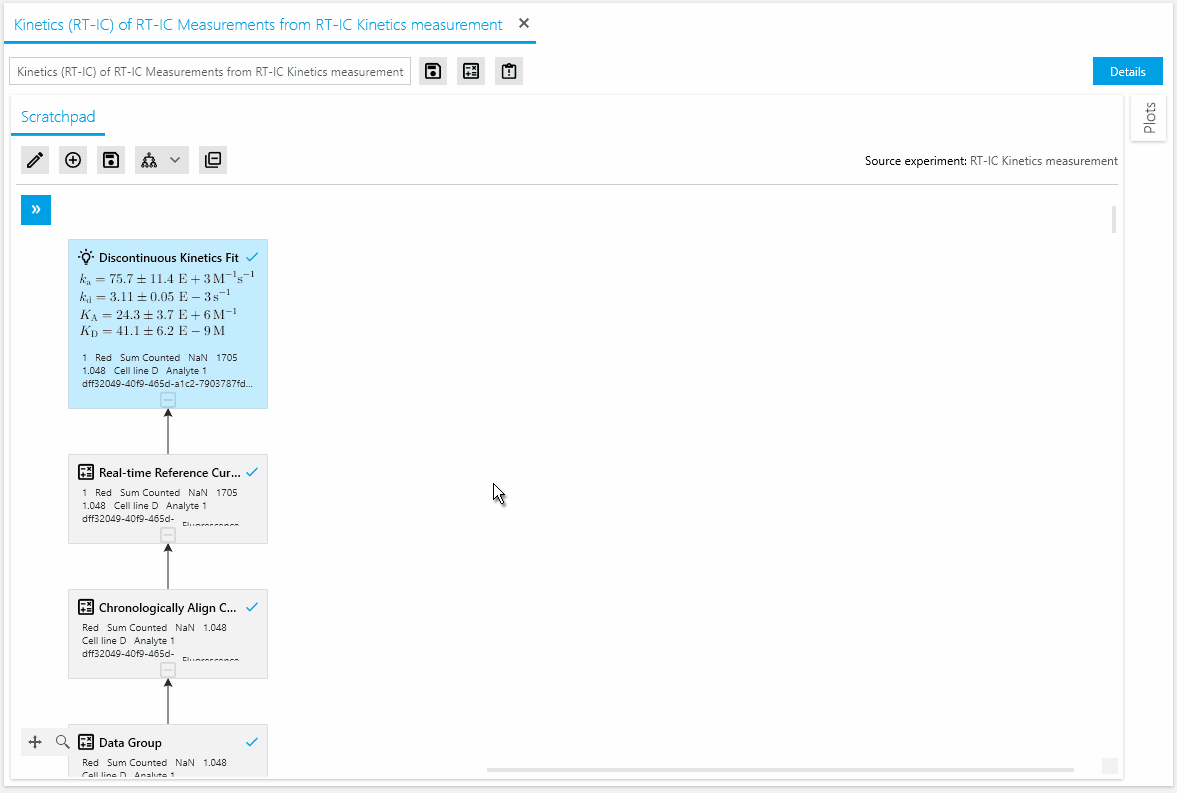
- Added discontinuous fit models to fit model selection in kinetics analyses
- Added ability to navigate from plots to their related images
- Added comprehensive quality control plots to RT-IC analyses
- Added discontinuous biphasic kinetics fit operation
- Added discontinuous monophasic-association biphasic-dissociation fit operation
- Added “Jump Removal” operation to allow correction of jumps from RT-IC traces
- Added “Order Curves” operation
- Added index to cursor tooltip for selected curves in plots
- Extended selection gestures within the legend of plots
Improvements
- Improved keyboard and mouse interactions with the Composite Method
- Improved display of long buffer names
- Removed TE40 maintenance buffer name
- Improved display of unsupported chips in a device’s chip tray
- Updated heliX® chip names
- Changed default sample spot for automated RT-IC kinetics analyses
- Changed units in RT-IC analyses plots to kcps and min
- Improved plot titles for batch and RT-IC kinetics analysis
- Improved space usage of overview plots in batch kinetics and RT-IC analyses
- Updated Icon and Label for vector properties in scratchpad plots according to selection state
- Improved ordering of standard operations in scratchpad context menu
- Fixed memory leak in Plot Model
Bug Fixes
- Fixed issue where legend could not be changed for Rate Maps in Details of Multiplex analysis
- Fixed issue where analysis might not open due to unavailable data
- Fixed curves staying selected after removal from plot
- Fixed issue with wrong assay parameters export when commas are included in headers
- Fixed issue where default plot axis title font was too small
- Fixed issue where font sizes were overwritten during a plot export
- Fixed chips not displaying status color in RFID tag
- Fixed chosen color not updated in RT-IC analyses wizard
- Fixed issue where elements failed to update
- Fixed vial position not showing on empty vial hovers
- Fixed missing re-grouping of items in the Images tab in the Experiment view when resizing the window
- Fixed overflowing popup window for edit plot properties Fixed plot name not showing up in plot panes
- Fixed plot titles not updating after X Axis scaling was applied
Bug Fixes
- Fixed missing persistence of initial values changed by the user
- Fixed issue where initial values of fit parameters were not restored correctly
- Fixed export of analyses using single source for multiple measurements missing the experiment
- Fixed configuration of proxy interfering with initial heliX connection
In case you need help, please do not hesitate to contact our support team at support@dynamic-biosensors.com.
INSTALL INSTRUCTIONS
We recommend to always use the newest versions of heliOS and heliX firmware.
Please update first your heliX device with the latest firmware version before installing a new version of heliOS.
SYSTEM REQUIREMENTS
Supported Operating System I Windows 10
heliOS requires the .NET 6 Desktop Runtime.
heliOS requires access to a postgreSQL database.
heliX FIRMWARE UPDATE
Note: The installation of a new heliX firmware version must be performed from a computer which is connected to the heliX device.
Note: Skip this step if you are only interested in updating the heliOS version on a computer which is not used to control the heliX device.
- Ensure that the heliX device is switched on and connected to the control PC (directly or via network).
- Download the above listed version of the heliX firmware. We recommend to always use the newest version.
- Run the EXE installer on the control PC and follow the setup steps. You can find the IP address of your heliX in heliOS under Devices.
After approx. 10 minutes the heliX will be restarted and ready to use.
INSTALLATION OF heliOS
Note: If heliOS is installed for the first time on a computer you need to first install the .NET 6 Desktop Runtime (see Installation of Microsoft .NET 6) and a PostgreSQL database (see Installation and setup of postgreSQL database).
- Download the above listed version of heliOS. We recommend to always use the newest version.
- Run the MSI installer and follow the setup steps.
- The first time you open heliOS on a computer you need to enter your license key (Settings → License).
Copy and paste the license key into the intended input field and confirm. - In addition to 3, the first time you are using heliOS you need to enter your database access data (Settings → Database).
- Now heliOS is ready to use and can, for example, be connected to your heliX device.
IMPORT OF heliOS METHODS
- Download the above listed heliOS methods.
- Unzip the downloaded file once. The unzipped folder contains a range of zipped heliOS methods. Do not unzip these files.
- Open heliOS and go to “Methods”.
- Click on “Import” in the top menu and select one or several heliOS methods (ZIP files) from the unzipped folder.
- Click on “Open”. Now your data base is equipped with the newest heliOS methods.
INSTALLATION OF MICROSOFT .NET 6
Note: heliOS requires the .NET 6 Desktop Runtime on your Windows operating system. If already installed you can skip this step.
- Download the .NET 6 Desktop Runtime installation file (64-bit version).
- Run the EXE installer and follow the setup steps.
- After the installation process has finished you are ready to install heliOS.
INSTALLATION AND SETUP OF A postgreSQL DATABASE
Note: heliOS requires a postgreSQL database either on a server in your local network or on your Windows operating system. The heliX control computer already comes with a set up postgreSQL database. Continue only if you want to install a second postgreSQL database on another computer.
- Download postgreSQL from the link below. Select version 12.X for Windows x86-64.
https://www.enterprisedb.com/downloads/postgres-postgresql-downloads - Run the EXE installer and follow the setup steps. Use the default settings and enter a password of your choice. We recommend to use the same password as on the heliX control computer (mypassword). Do not launch the Stack Builder at the end of the installation wizard.
- After the installation of postgreSQL open the Windows Run app (or press the Windows+R keys on the keyboard).
- Enter the following command line into the field and confirm: c:\Program Files\PostgreSQL\12\bin\createdb.exe -U postgres heliOS
- You now will be asked for a password. Enter the password you selected during the postgreSQL installation and press Enter. If you will be asked again for the password, enter it again and confirm with the Enter key.
- Repeat step 3 and enter the following command line into the field. Confirm afterwards: c:\Program Files\PostgreSQL\12\bin\createuser.exe -P -Upostgres heliOS
- Repeat step 5 (Enter the password).
- Now, you can start heliOS with the following database credentials (Settings → Database):
Host: localhost | Database: heliOS | User: heliOS | Password: [your password] - Enter your heliOS license key (Settings → License) if necessary.
If you need help with setting up the postgrSQL database please ask your system administrator or contact our support team at support@dynamic-biosensors.com.
In case you need help, please do not hesitate to contact our support team at support@dynamic-biosensors.com.
Questions?
Contact Us
Our support team is happy to help.