heliOS Software
Download 2024.1
With heliOS 2024.1, we are thrilled to introduce a new heliX Adapter Chip Test Analysis, major updates to batch data analysis within the Manual Analysis, alongside a new Drift Correction Operation for both switchSENSE as well as RT-IC users, all aimed at elevating the quality and utility of data analysis, interpretation, and export.
heliOS
version 2024.1.5
(124 MB)
heliOS Methods
for switchSENSE®
version 2024.1.5 (14.1 MB)
heliOS Methods
for scIC (formerly RT-IC)
version 2024.1.5 (3.7 MB)
heliX Firmware
version 7.352.5.2190
(1.1 GB)
heliX Quick Start
Guide
version 7.1 (2.5 MB)
IMPORTANT: If you install just for you (new default, non-administrative installation) heliOS will be only installed for the currently logged in user.
As a consequence, heliOS will not be able to access settings from previous installations. Therefore, please ensure you have access to critical settings, like your license key or database credentials. If you install for all users of this machine nothing will change, but you will require administrative rights for the installation.
Note: The new heliOS version does not require a separate heliX firmware update if your heliX firmware is already compatible
with version 7.352.5.2190. For each new version of heliOS it is mandatory to update the methods!
SYSTEM REQUIREMENTS
Supported Operating System I Windows 10 and higher
heliOS requires the .NET 6 Desktop Runtime.
heliOS requires access to a postgreSQL database.
→ see install instructions
We are thrilled to introduce a new heliX Adapter Chip Test Analysis, major updates to batch data analysis within the Manual Analysis, alongside a new Drift Correction Operation for both switchSENSE as well as RT-IC users, all aimed at elevating the quality and utility of data analysis, interpretation, and export.
New heliX Adapter Chip Test Analysis
We are thrilled to introduce the new heliX Adapter Chip Test Analysis, a comprehensive solution designed to swiftly assess the quality of your heliX Adapter Chips. This analysis is composed of four quality checks for evaluating data obtained from your chip.
First, we confirm that ligand injection results in the expected jump in fluorescence.
Next, all relevant inflection points are identified during voltage calibration.
We then ensure that the relative amplitudes on both spots surpass the given threshold for this specific chip.
Lastly, we verify that all essential information can be read from the RFID tag embedded within the chip.
Each quality check comes with visual representations of the relevant data, enabling you to confirm the chip’s quality with ease.
The results table provides raw numeric values for inflection points, relative amplitudes, and other pertinent quantities.
Additionally, an image of the chip surface recorded during testing is available for visual confirmation of its integrity.
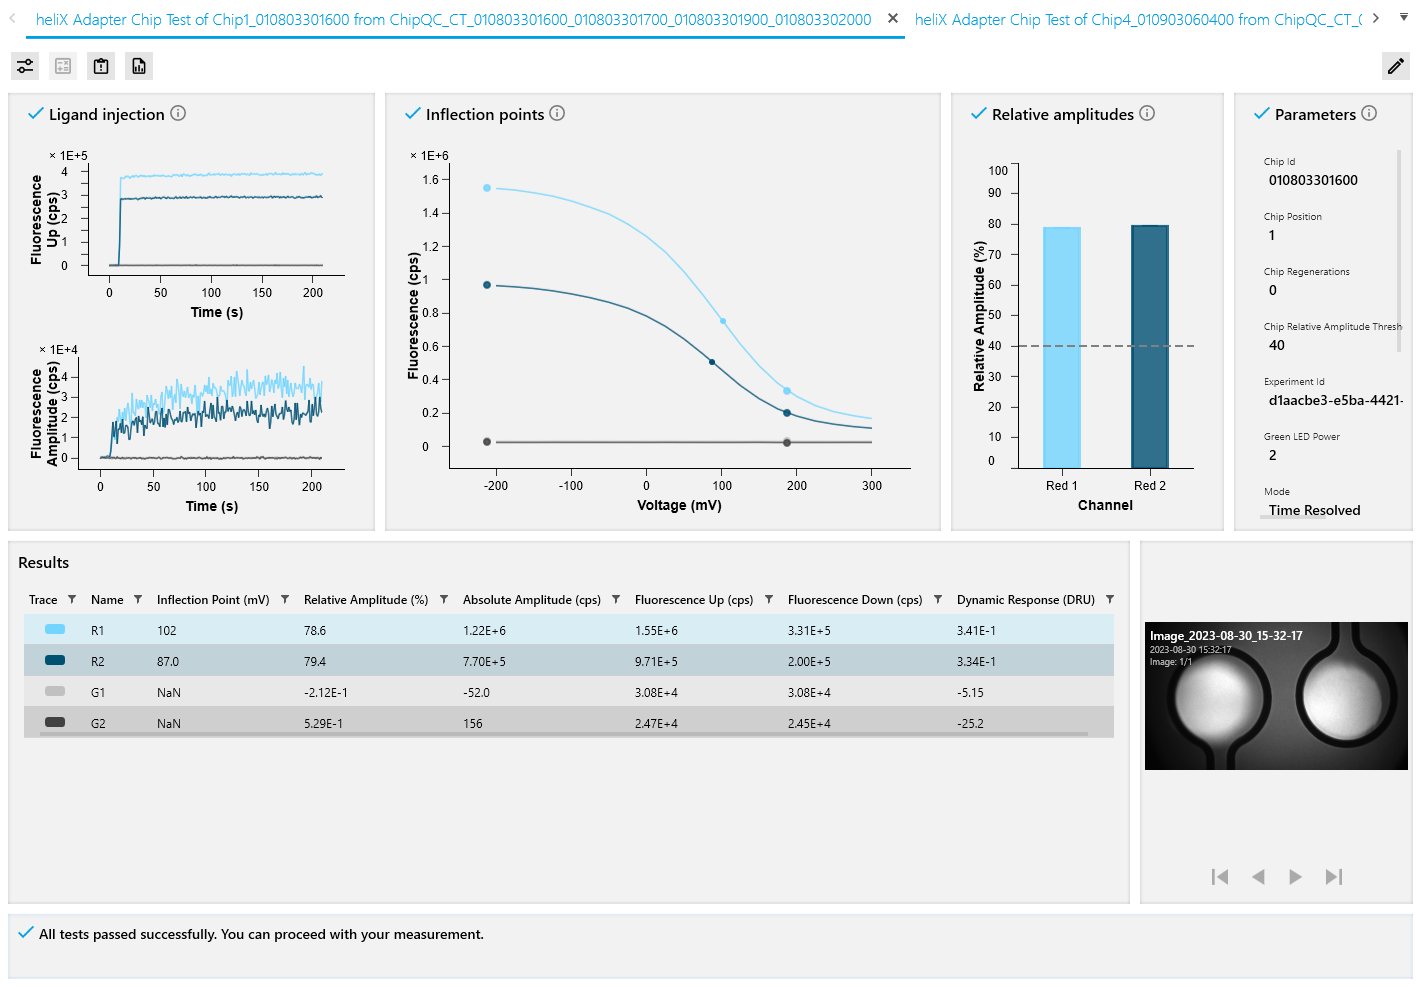
When issues are detected within the Adapter Chip Test data during quality checks, these problems will be clearly identified in both the failing check and the final verdict. The verdict will outline the specific issue (e.g., Relative amplitude(s) too low) along with a suggested list of possible reasons, ranked from most to least likely. Each reason will include recommendations for resolving the detected issue.

The new heliX Adapter Chip Test Analysis is your go-to tool for evaluating the quality of your heliX Adapter Chips. The data generated through heliX Adapter Chip Test assays remains compatible with the existing Chip Status Analysis. However, be aware that the Chip Status Analysis assesses less data and lacks automatic quality checks. For a comprehensive assessment of your heliX Adapter Chip’s quality, we strongly recommend utilizing the new heliX Adapter Chip Test Analysis.
Manual Analysis Upgrade for Batch Analyses
The expanded capabilities of our Manual Analysis system now cater to the efficient processing of multiple similar datasets (batch analysis). Inspired by the versatile data acquisition of our heliX and heliXcyto line instruments, we are thrilled to introduce new features that were previously exclusive to Automated Analyses.
Grouped Data Imports
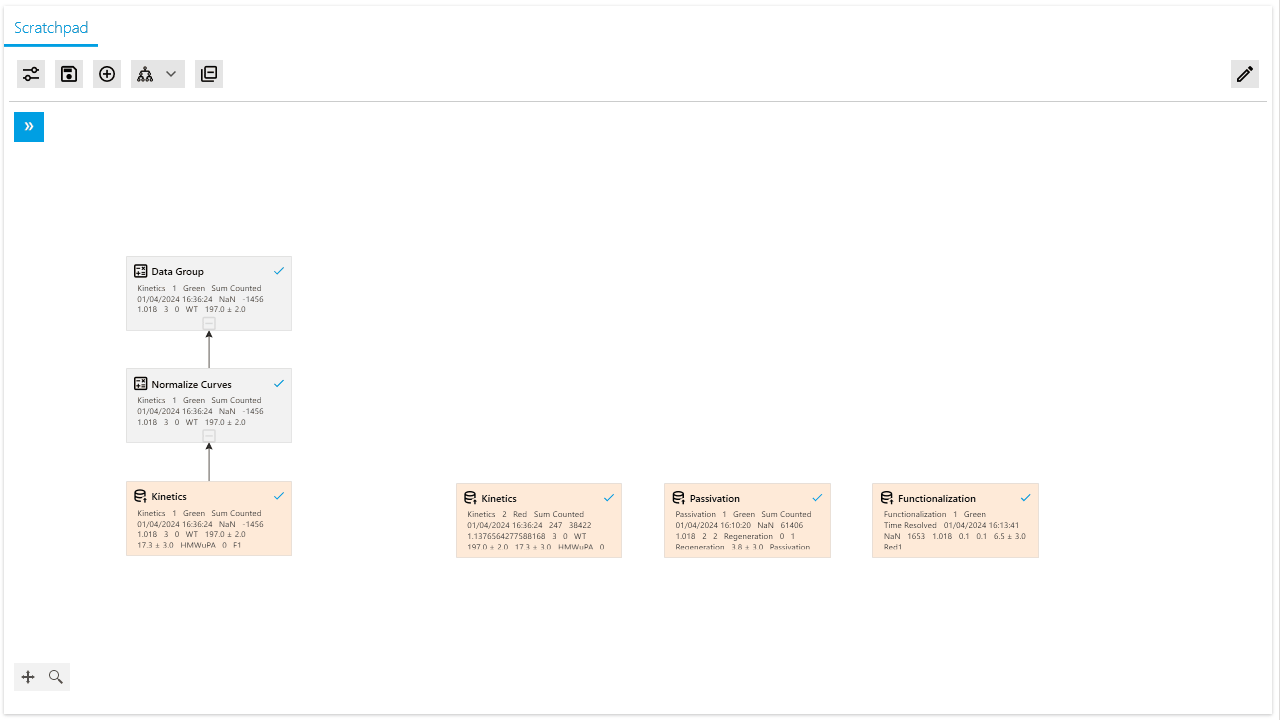
The first significant addition is the ability to automatically group Measurements into Data Sources based on chosen Metadata. Previously, you could only import Measurements as individual Data Sources or combine multiple measurements into one Data Source. With this update, you may now select multiple Measurements and import them grouped into Data Sources based on shared Metadata.
This feature allows for creating distinct Data Sources based on different measurement channels, ligand-sample pairs, or any other combination of available Metadata. Each created Data Source will have a unique name derived from the selected Metadata.
The ability to group measurements by Metadata also introduces the import of measurements with different measurement modes in a single step. Previously, importing measurements with varying modes in a single step was not allowed due to each mode’s distinct configuration options.
With our new Grouped Data Imports feature, we have enabled the import of measurements with different modes by enforcing the grouping based on measurement modes. This way, we ensure that each Data Source is configurable for its respective measurement mode while simplifying the process of importing the data.

Smart Pasting of Analysis Pipelines
Copy-pasting analysis pipelines is a time-saving technique for performing identical or near identical analyses on different datasets. In the past versions, pasted analysis pipelines appeared at a fixed position in the Analysis Scratchpad, leading to inconvenience when focused on an area far away from this fixed position.
With our latest update, we have modified the behavior so that pasted analysis pipelines now appear at the current mouse cursor position. This change in behavior enhances your productivity by reducing the hassle of repeatedly navigating to a distant fixed location.
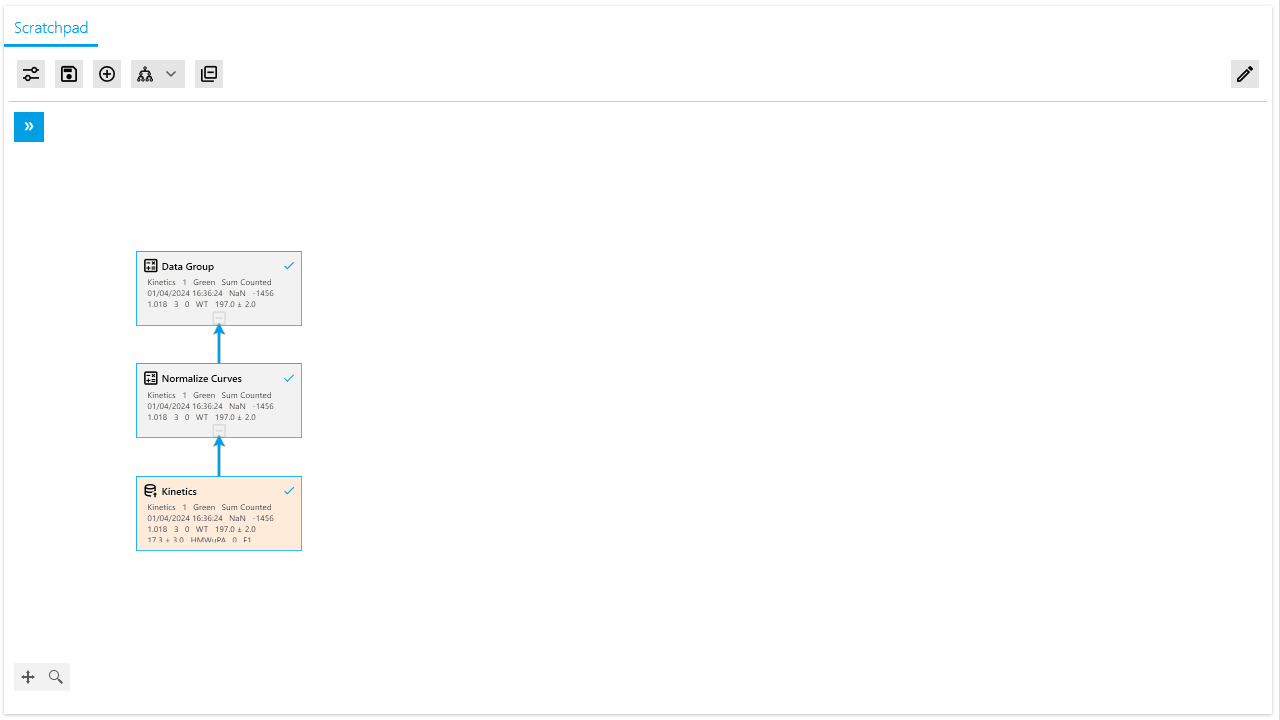
Analysis pipelines can also be easily copied using the standard copy (Ctrl+C) and paste (Ctrl+V) shortcuts.
A frequent use case of copy-pasting analysis pipelines involves the analysis of data from another Data Source. In earlier versions, this process required two separate steps: first pasting the analysis pipeline, then manually connecting it to your Datasource of interest.
To streamline this process, we have introduced the “Paste and Link selection to” option for Analysis Elements. This allows you to reuse an already created pipeline on another Data Source with a single command.
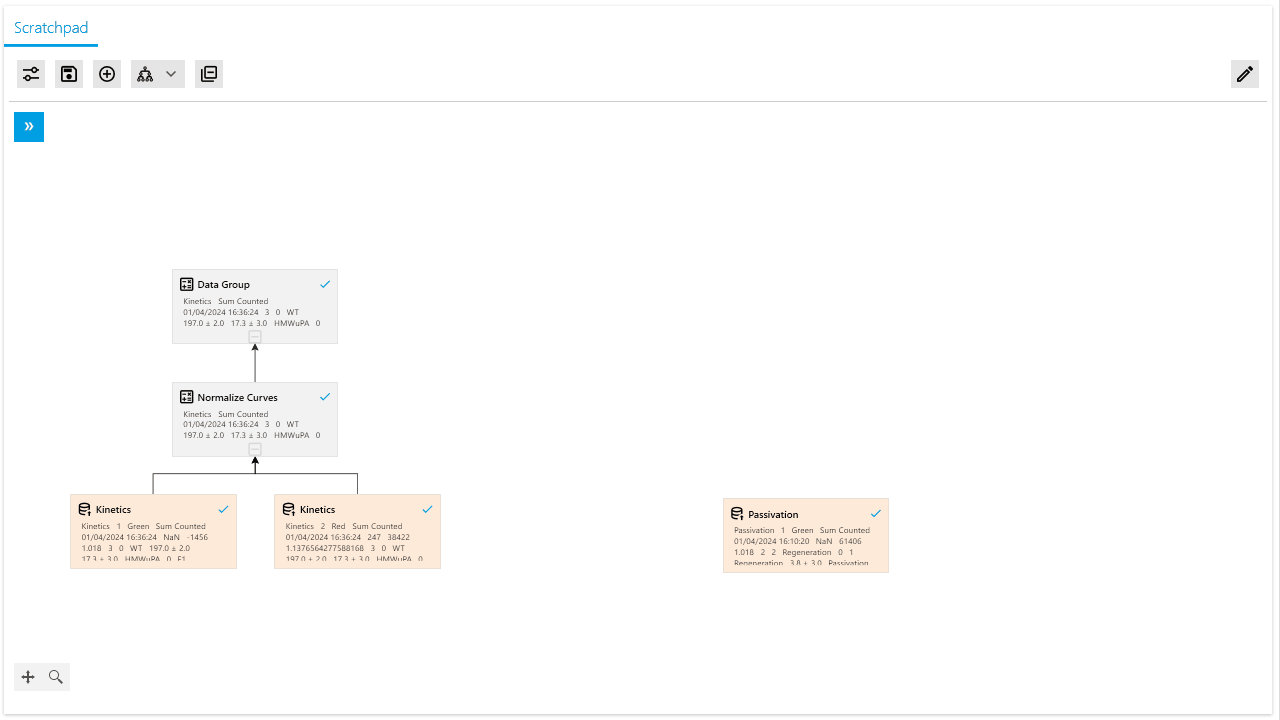
We have further expanded the ability to paste and link analysis pipelines by enabling their connection to multiple Data Sources. Instead of merely pasting and linking an Analysis Element to a single Data Source, you may now select multiple Data Sources and paste and link independent pipelines for each. For this process, copy the pipeline you wish to paste, select the desired Analysis Elements, and choose “Paste and Link Selection To” from the context menu.
Each selected Analysis Element will be connected to an independent copy of the analysis pipeline.
We refer to this process as Batch Pasting.
Combining our new Batch Pasting process with the Grouped Data Imports creates a powerful workflow for batch analyzing heliX data with custom analysis pipelines. First, import your data according to the desired independent groups (e.g., Sample-Ligand-pairs). Then, build the analysis pipeline on top of one of these created Data Sources until you are satisfied with the results. Lastly, copy and paste the pipeline onto each of the other Data Sources using a single command.
New Operation: Drift Correction
Data analysis frequently encounters minor linear drifts that can distort the underlying signal and compromise accurate interpretations. Identifying and addressing these drifts is crucial for obtaining valid results.
With this objective, we have developed our new Linear Drift Correction Operation. This operation processes user-supplied data by calculating a linear regression using points from the start and end of each curve. Subsequently, it eliminates the detected drift, enabling proper analysis of the corrected signal.
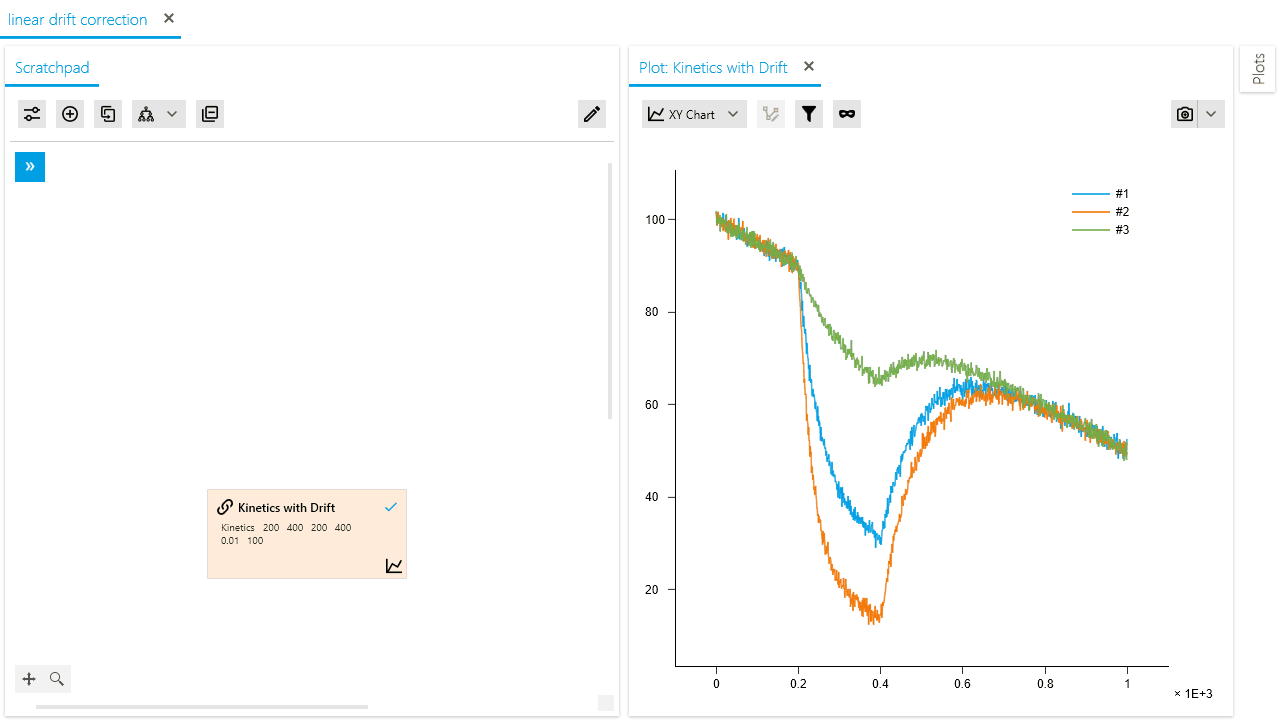
The operation relies on the assumption that data points at the beginning and end of each curve represent a consistent baseline.
However, in scenarios where this assumption is invalid, detected drifts may result in artificial anomalies.
When necessary, users can configure the operation to disregard any points from the end of the curves.
In such cases, successful linear drift removal from the data may become possible.
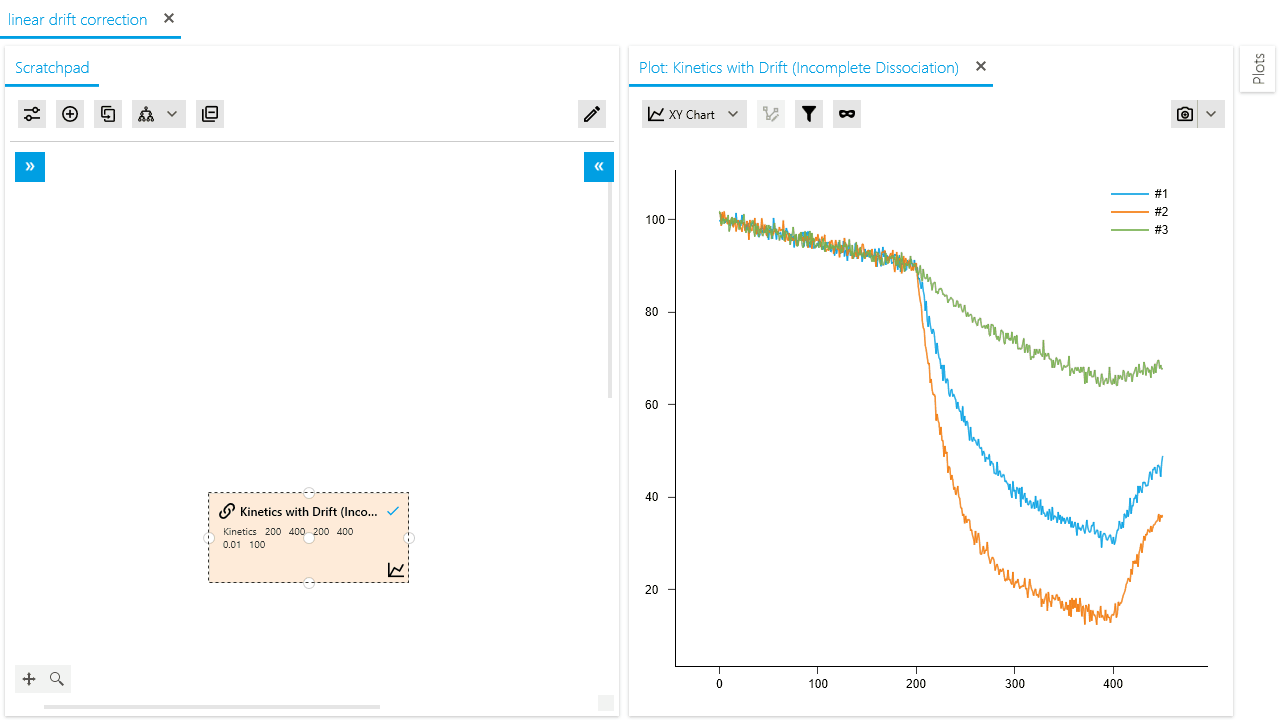
Please note that this operation caters specifically to correcting a linear signal drift in your data.
It is imperative to meticulously examine any drift prior to correction, as biological or other factors may be responsible for the observed drift.
—
Upgrade now to uncover these exciting new features:
the heliX Adapter Chip Test Analysis,
the advanced Drift Correction Operation,
and expanded batch analysis capabilities in the Manual Analysis.
These improvements equip scientists and technical assistants with the tools to analyze results accurately and swiftly, fostering groundbreaking discoveries. Stay tuned as we continually refine and innovate on our heliOS software platform, dedicated to delivering a smooth and enlightening user experience.
Thank you for being a valuable part of our journey to make heliOS more powerful and user-friendly.
FEATURES
Automated Analysis:
– Add updated explanations and hints for chip test analysis quality gates
– Add heliX Adapter Chip Test Analysis
Manual Analysis:
– Add option to group-import measurements into manual analysis
– Enhance copying and pasting of elements in manual analysis including option to paste and link to (multiple) targets
– Add linear drift correction operation
– Allow modification of fit plot properties through residuals plot
– Use unilateral bounds for amplitudes of dissociation kinetics fits
– Restrict calculation of dynamic response values to cases where fluorescence up is significantly larger than fluorescence down
BUG FIXES
Automatic Analysis:
– Fix data not rendering in all cases during Substrate Titration analysis
– Fix biphasic kinetics rates being set to shared in kinetics screening analyses where they should be non-shared
– Fix failure when creating multiplex kinetics screening analysis
– Fix value for fluorescence jump threshold in functionalization quality gate
– Fix Metadata view in automated analysis showing more than 2 columns
– Fix Donor plot not updating when recalculating Kinetics for FRET analysis
– Fix Batch Kinetics Analysis sometimes showing empty plots
– Fix recalculate operation for batch analysis
– Fix newly created automated analyses not opening in edit mode
Manual Analysis:
– Disallow resetting initial values of multiple selected fit operations at once
– Fix incorrect selection of jump correction points
– Fix masking tool selecting incorrect points
– Fix rare issue where application would crash during masking operation
– Fix jumps to previous plots in the diagram side bar when selecting one of the last plots
– Fix crash when changing plot types
– Fix diagram side bar preview plot being editable
– Fix rare crash when pasting analysis elements
Assays:
– Fix rare issue where sample distribution is broken
– Fix rare issue where heliOS crashes while updating an assay
Methods:
– Fix non updating options of element string parameters in methods
– Fix some methods opening in edit mode when set to open in read mode
– Fix crash when opening a method
– Fix issue where some errors do not show the line and column number in script editor
General:
– Fix snapshot loaders loading snapshots from larger major version
– Fix database settings remaining in an unconfirmed state after first save
CHANGELOG FOR heliOS 2024.1.3
– Fix crash when loading an experiment from a heliX device with a single detector
– Fix crash when setting plot legend template to some metadata specific to biphasic fit
– Fix crash when pasting an alias into another manual analysis
CHANGELOG FOR heliOS Methods 2024.1.3
– Fix issue with RT-IC dual-color methods
Please use only the newest version!
CHANGELOG FOR heliOS 2024.1.4
– Fix failure to update DrzLang documentation when connecting to a heliX device for the first time
Please use only the newest version!
CHANGELOG FOR heliOS 2024.1.5
– Show placeholder instead of no image
Bug Fixes
– Fix crash when receiving empty image data from heliX
– Fix average operation producing incorrect data in certain circumstances
– Fix the issue where the context menu is not shown in plots in automated analyses
– Fix issue where invalid limits were applied in function parameters in scripts using json documentation
Please use only the newest version!
HOW to update methods:
- download the newest scIC (formerly RT-IC) methods from the DBS website
- go to Method section in heliOS
- use the Import button on the top and select the (entire) downloaded zip file
The methods with the same names are automatically updated.
Passivation
Each assay now includes an optional chip passivation check box similar to chip wash. When enabling Chip passivation for a run, the user can add their own passivation solution to be used as pre run surface passivation. The passivation reagent (e.g. BSA, blocking reagent) is delivered to the chip with 10 minute incubation time, followed by a short rinse. This procedure can help prevent unspecific binding.

Dual Color measurements
Dual color assays provided follow the same logic as the single color variants. Changes include a separate LED intensity input field per color channel and name/concentration fields can hold values for both components in sample vials (separated with comma). First name and/or concentration in the field is always for the green component, and second for the red.
Cyto System wash
In order to keep the heliXcyto clean throughout several rounds of cell measurements, we have updated our system wash method. When adding it through custom methods, you will notice a faster run time (now about 1 hour), and the Cleaning Solution 3 in the sample list:

HOW TO USE: Add the system wash in your assay sequence after every 1-3 runs with cells, latest at the end of your assay. Use between two different cell lines.
IMPORTANT: Please run the system wash ONLY on a maintenance chip, never on a cyto chip with traps! Each system wash is counted as regeneration on the maintenance chip. When the regeneration counter hits 50 repeats (visible in heliOS in the Device control), please exchange the maintenance chip.
HOW to update methods:
- download the newest switchSENSE methods from the DBS website
- go to Method section in heliOS
- use the Import button on the top and select the (entire) downloaded zip file
The methods with the same names are automatically updated.
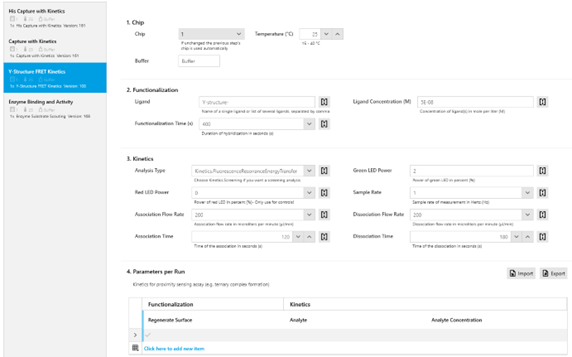
New structured and easy-to-use Custom Assays for the following setup:
- Capture with Kinetics (e.g, Biotin, FC, etc.)
- Functionalization and Kinetics (for screening of analytes and batch analysis)
- Dye Scouting
- Y-Structure FRET Kinetics (for ternary vs binary binding affinities)
- Enzyme Binding and Activity
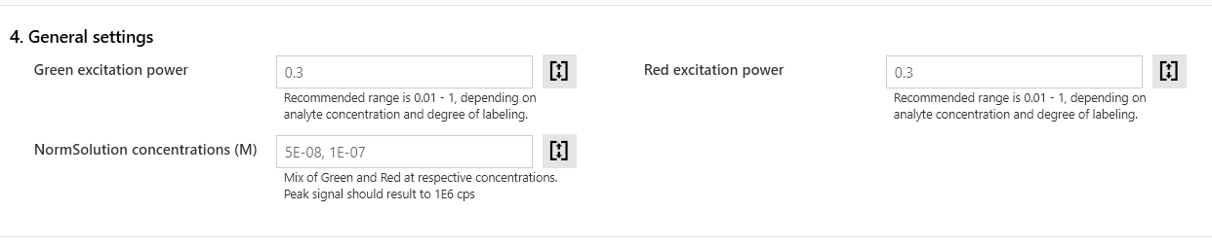
The optimal parameters (e.g., functionalization time, flow rates, LED power, etc.) are already set up in the heliOS assay (see Fig. below); however, values can be easily modified depending on your needs.
For further questions, please contact the support team at support@dynamic-biosensors.com.
In case you need help, please do not hesitate to contact our support team at support@dynamic-biosensors.com.
INSTALL INSTRUCTIONS
We recommend to always use the newest versions of heliOS and heliX firmware.
Please update first your heliX device with the latest firmware version before installing a new version of heliOS.
For each new version of heliOS it is mandatory to update the methods.
SYSTEM REQUIREMENTS
Supported Operating System I Windows 10 and higher
heliOS requires the .NET 6 Desktop Runtime.
heliOS requires access to a postgreSQL database.
heliX FIRMWARE UPDATE
Note: The installation of a new heliX firmware version must be performed from a computer which is connected to the heliX device.
Note: Skip this step if you are only interested in updating the heliOS version on a computer which is not used to control the heliX device.
- Ensure that the heliX device is switched on and connected to the control PC (directly or via network).
- Download the above listed version of the heliX firmware. We recommend to always use the newest version.
- Run the EXE installer on the control PC and follow the setup steps. You can find the IP address of your heliX in heliOS under Devices.
After approx. 10 minutes the heliX will be restarted and ready to use.
INSTALLATION OF heliOS
Note: If heliOS is installed for the first time on a computer you need to first install the .NET 6 Desktop Runtime (see Installation of Microsoft .NET 6) and a PostgreSQL database (see Installation and setup of postgreSQL database).
- Download the above listed version of heliOS. We recommend to always use the newest version.
- Run the MSI installer and follow the setup steps.
- The first time you open heliOS on a computer you need to enter your license key (Settings → License).
Copy and paste the license key into the intended input field and confirm. - In addition to 3, the first time you are using heliOS you need to enter your database access data (Settings → Database).
- Now heliOS is ready to use and can, for example, be connected to your heliX device.
IMPORT OF heliOS METHODS
- Download the above listed heliOS methods.
- Unzip the downloaded file once. The unzipped folder contains a range of zipped heliOS methods. Do not unzip these files.
- Open heliOS and go to “Methods”.
- Click on “Import” in the top menu and select one or several heliOS methods (ZIP files) from the unzipped folder.
- Click on “Open”. Now your data base is equipped with the newest heliOS methods.
INSTALLATION OF MICROSOFT .NET 6
Note: heliOS requires the .NET 6 Desktop Runtime on your Windows operating system. If already installed you can skip this step.
- Download the .NET 6 Desktop Runtime installation file (64-bit version).
- Run the EXE installer and follow the setup steps.
- After the installation process has finished you are ready to install heliOS.
INSTALLATION AND SETUP OF A postgreSQL DATABASE
Note: heliOS requires a postgreSQL database either on a server in your local network or on your Windows operating system. The heliX control computer already comes with a set up postgreSQL database. Continue only if you want to install a second postgreSQL database on another computer.
- Download postgreSQL from the link below. Select version 12.X for Windows x86-64.
https://www.enterprisedb.com/downloads/postgres-postgresql-downloads - Run the EXE installer and follow the setup steps. Use the default settings and enter a password of your choice. We recommend to use the same password as on the heliX control computer (mypassword). Do not launch the Stack Builder at the end of the installation wizard.
- After the installation of postgreSQL open the Windows Run app (or press the Windows+R keys on the keyboard).
- Enter the following command line into the field and confirm: c:\Program Files\PostgreSQL\12\bin\createdb.exe -U postgres heliOS
- You now will be asked for a password. Enter the password you selected during the postgreSQL installation and press Enter. If you will be asked again for the password, enter it again and confirm with the Enter key.
- Repeat step 3 and enter the following command line into the field. Confirm afterwards: c:\Program Files\PostgreSQL\12\bin\createuser.exe -P -U postgres heliOS
- Repeat step 5 (Enter the password).
- Now, you can start heliOS with the following database credentials (Settings → Database):
Host: localhost | Database: heliOS | User: heliOS | Password: [your password] - Enter your heliOS license key (Settings → License) if necessary.
If you need help with setting up the postgrSQL database please ask your system administrator or contact our support team at support@dynamic-biosensors.com.
In case you need help, please do not hesitate to contact our support team at support@dynamic-biosensors.com.
Questions?
Contact Us
Our support team is happy to help.