heliOS Software
Download 2023.2
With heliOS 2023.2, we are excited to announce a significant update to our Real-Time Interaction Cytometry (RT-IC) analyses and several other powerful enhancements to improve data analysis and interpretation.
heliOS
version 2023.2.1
(123 MB)
heliOS Methods
for switchSENSE®
version 2023.2 (10.7 MB)
heliOS Methods
for RT-IC
version 2023.2 (1.3 MB)
heliX Firmware
version 7.352.5.2190
(1.1 GB)
heliX Quick Start
Guide
version 7.1 (2.5 MB)
Note: Before running a new heliOS version, a firmware update of your heliX or heliXcyto device is necessary.
INFO
With the new firmware update the fluidics control of your heliX biosensor will be improved which leads to better sample injections.
Note: After the update, the first priming/wake up & prime is used to calibrate the system automatically in order to activate the improved fluidics control. This may take up to 1 hour.
Please prepare the system and follow the instructions as described below:
- Update your system as described in the install instructions.
- Open heliOS 2023.2 and connect to your updated heliX instrument.
- Run a Clean & Sleep (skip this step if the instrument is already in sleeping mode).
- After the Clean & Sleep, connect at least 250 mL buffer to buffer tubes 1 and 3, respectively.
- Make sure that the water vial at sample tray position A is filled with fresh deionized water (10 mL).
- Place a Maintenance Chip into the chip tray at position 5.
- Insert the chip and the sample tray.
- Run a Wake Up & Prime. This may take up to 1 h untill the system is fully calibrated.
- Wait until the run has finished. Now the instrument is calibrated and ready to be used again.
SYSTEM REQUIREMENTS
Supported Operating System I Windows 10 and higher
heliOS requires the .NET 6 Desktop Runtime.
heliOS requires access to a postgreSQL database.
→ see install instructions
We are excited to announce a significant update to our Real-Time Interaction Cytometry (RT-IC) analyses and several other powerful enhancements to improve data analysis and interpretation.
RT-IC Analyses
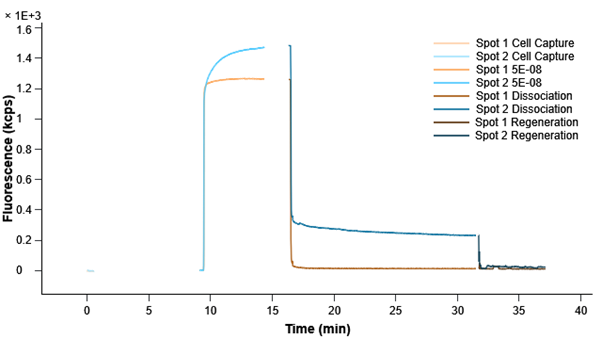
In this update, we have focused on enhancing the visualization capabilities of RT-IC analyses. The color scheme in all plots has been refined, resulting in a more intuitive representation of data. Researchers can now easily identify patterns and anomalies, gaining valuable insights at a glance.
Additionally, we have simplified the analysis pipeline to reduce complexity without compromising detailed analysis capabilities. This streamlined process enables researchers to perform in-depth analysis and derive meaningful results more efficiently.
New Operation: Outlier Removal
We are thrilled to introduce a new mathematical operation specifically designed to remove outliers from raw measurement data. This operation automatically identifies and masks outliers using an intelligent algorithm. Researchers also have the flexibility to manually mask or unmask data points as needed, providing greater control over the analysis process.
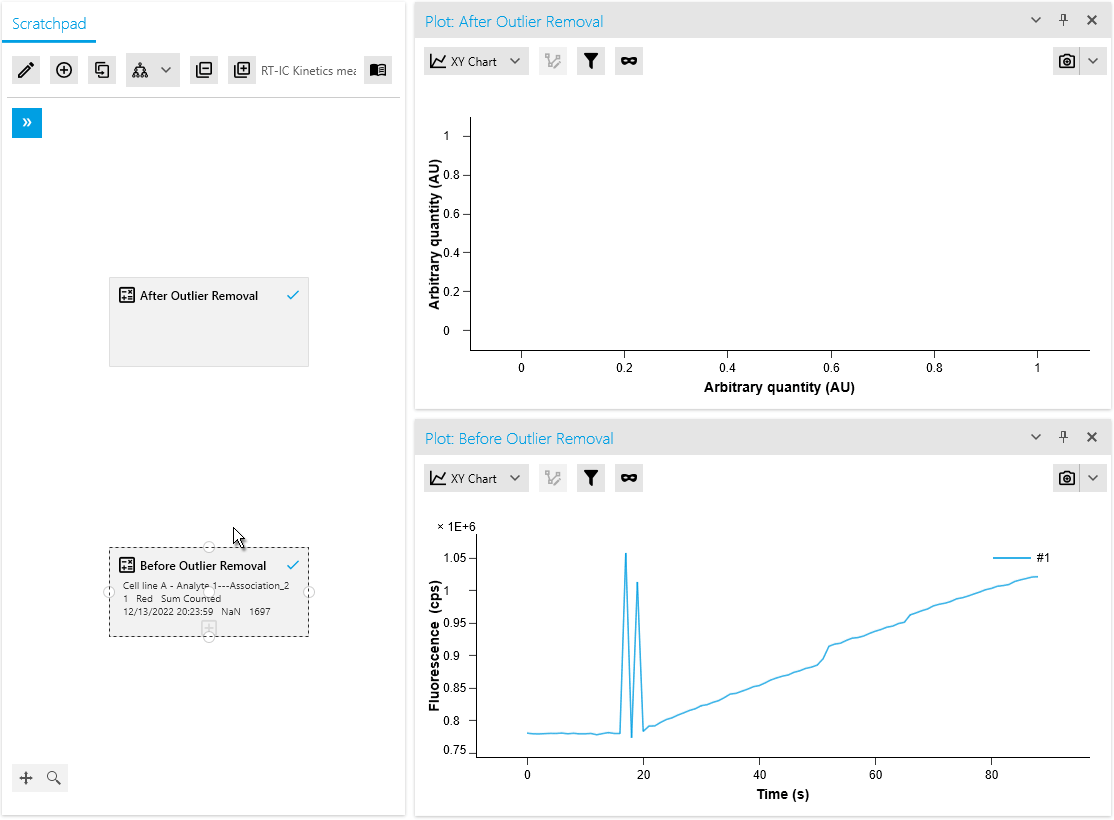
By efficiently distinguishing valid measurements from anomalies, this operation ensures improved data quality. It saves time with automated outlier detection and empowers researchers to make necessary adjustments based on domain expertise or additional information.
Improved Usability for Point Selection Operations
Our artifact removal operations, including Mask Points and Jump Removal, have been significantly enhanced to simplify the process of removing measurement artifacts. With the introduction of a dedicated plot for artifact removal, researchers can now utilize specialized point markers to easily identify and remove artifacts.
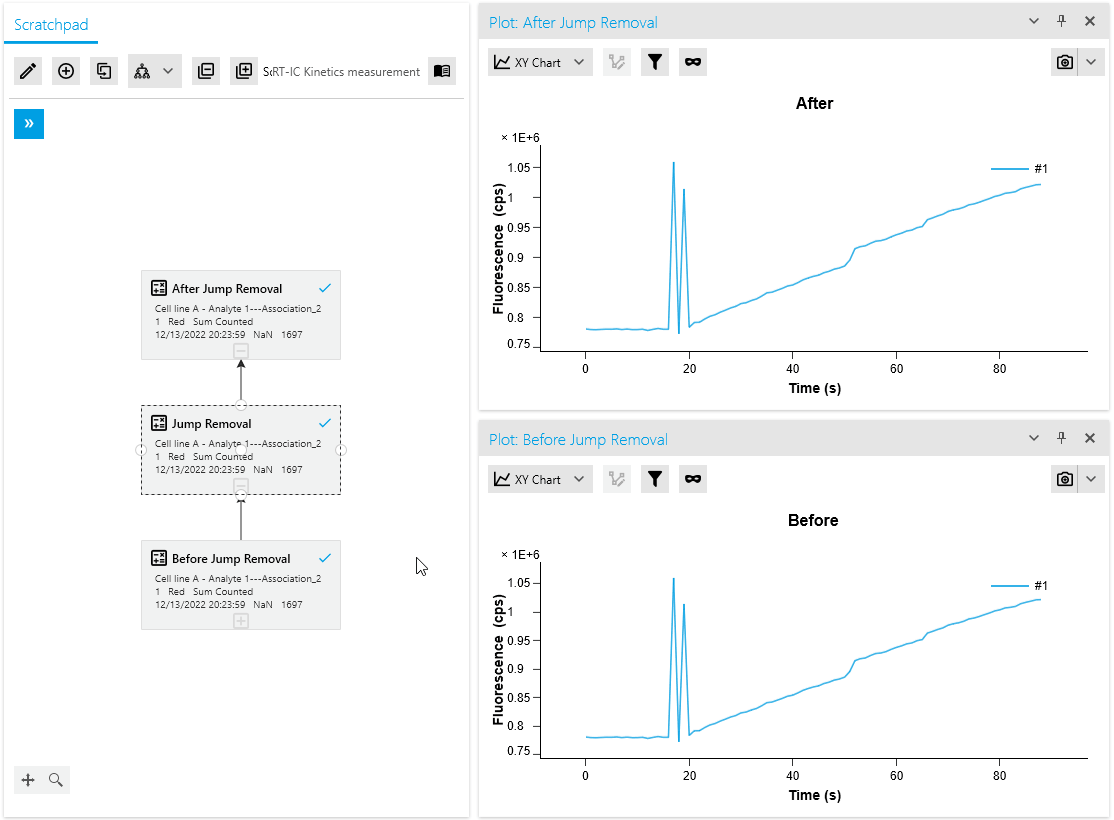
This advanced point selection feature ensures precise artifact removal, improving the accuracy and efficiency of data cleaning. Researchers can now seamlessly identify and eliminate measurement artifacts, resulting in more reliable analysis outcomes.
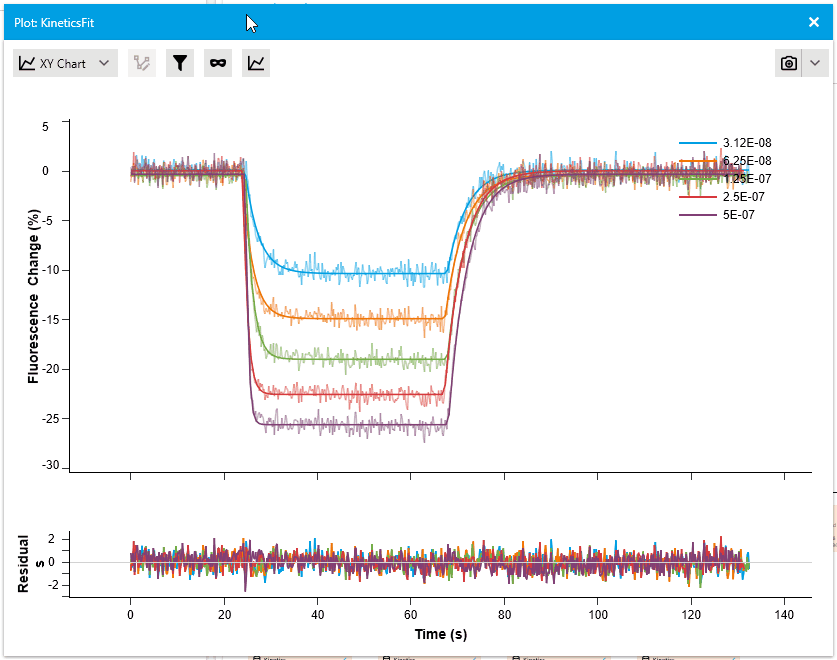
New Residual Plots when plotting Fit Results
We are pleased to introduce a new feature that enhances fit analysis. In this release, we have included a supplementary residuals plot alongside every fit plot. This residuals plot visually displays discrepancies between the fitted model and the actual data, providing researchers with a comprehensive assessment of fit quality.
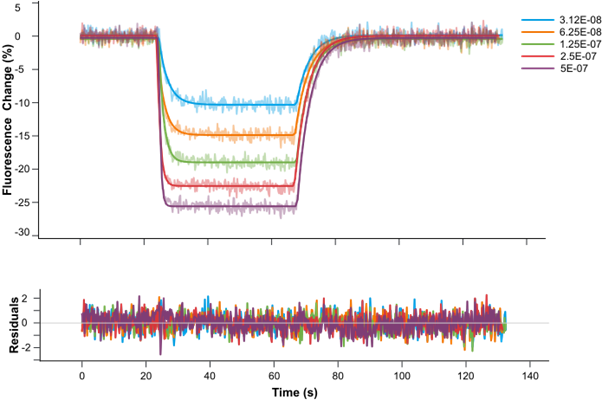
By observing the deviations between the fit curve and data points, researchers can gain deeper insights into the accuracy of the fit models. The residuals plot is automatically included with fit plots, and users have the option to hide it if desired. This addition allows for more informed judgments and improved fit analysis.
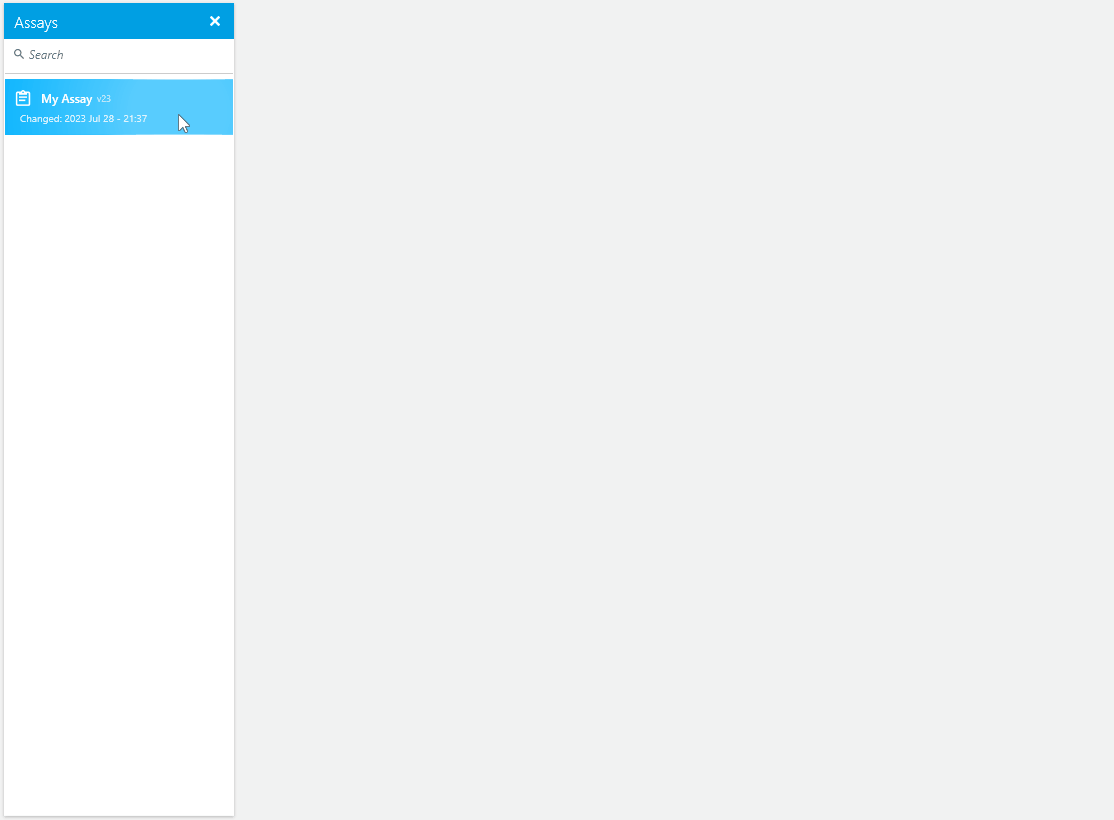
Navigation: Read-Mode and Edit-Mode
We are excited to introduce a new feature that offers enhanced flexibility and control over the documents in our scientific software. Method, Assay, and Analysis documents can now be viewed in read-mode or edited in edit-mode.
In read-mode, these documents can be securely accessed in a read-only format, ensuring data integrity and preventing accidental changes. Switching to edit-mode enables researchers to make deliberate modifications to the documents as needed.
For added convenience, users can configure their documents to open in read-mode by default, minimizing the risk of accidental modifications and providing an added layer of change protection.
Upgrade now to experience these enhancements and enjoy improved data visualization, simplified analysis pipelines, streamlined artifact removal, enhanced fit analysis with residuals plots, and flexible document viewing and editing modes. These updates empower researchers to interpret and analyze results confidently and efficiently, facilitating valuable scientific discoveries.
FEATURES
- RT-IC Analyses:
- Update automated RT-IC analyses to create QC plots from merged trees
- Add explicit Spot Fluorescence Normalization to automated RT-IC analyses
- Improve colorization of RT-IC analysis plots
- New Operation: Outlier Removal:
- Add new markers for forced and prevented outlier points
- Add outlier removal operation to RT-IC analyses
- Add outlier detection operation
- Add jump removal operation to RT-IC kinetics analysis
- Improved Usability for Point Selection Operations:
- Add possibility to select masked positions through plot in Masked Values editor
- Add description for jump positions parameter
- Add ability to update jump positions using the ENTER key on input fields
- Add possibility to zoom in jump removal editor plot
- Add point marker for selected points in jump removal
- Replace vector hash codes with underlying curve color in jump removal editor window
- Add point selection for JumpRemoval
- New Residual Plots When Plotting Fit Results:
- Add ability to export main and residual plots together
- Enable synchronization of vector selection in fit plots
- Add x axes synchronization between data and residuals plots
- Add extract fit operation
- Add preservation of fit results permitting combined visualization
- Add fit residuals to data exports of fit results
- Navigation: Read-Mode and Edit-Mode:
- Add navigation automated analysis when entering read mode in scratchpad
- Add access modes to analyses
- Add read mode to Assays
- Add support for automatic read mode for methods
- Add support for read mode for method scripts
- Add persistence for document mode
- Add option for method documents to always open them in read-mode
- Add switching between read mode and edit mode in method flow diagram
- Add new button for switching between read mode and edit mode for methods
- Replace method settings icon
- Add switching between read mode and edit mode in method flow diagram
- Add new button for switching between read mode and edit mode for methods
- New Metadata:
- Add vial name to manual analysis 2D series metadata
- Add measurement id to metadata
- Add handling of dissociation-only data with missing concentration metadata to full-range kinetics fits
- Add update of fluorescence background and amplitude ratio metadata to spot fluorescence normalization
- Methods: Introduce Custom Preview Simulations:
- Add simulation parameter input validation
- Add simulation formula parameter editing errors to formula view
- Validate user entered simulation formulae to avoid special character usage
- Add parameter group name to simulation parameter linking screen
- Add user confirmation dialog before deleting simulation from method
- Allow users to edit simulation formulas with LateX preview
- Dialogs for linking method parameters to simulation parameters are more descriptive
- Allow user to link simulation parameters to method parameters through dialog selection
- Add a new dialog view for selecting simulation parameters
- Add data simulations with formula parser to custom methods
- Other:
- Add ability for user to toggle legend visibility in exports
- Improve functionality for toggling fullscreen in experiment image slideshow
- Add generator to modify run values in assays
METHODS
- Fix issue where software crashes while using the tab key several times in composite method
- Fix missing hover effect in methods element parameters
- Fix application crashes when an argument was defined twice for a function in scripts
- Fix method elements not always highlighting when user moused over their parameters
- Fix issue where the method element parameters could not be scrolled through
- Fix missing border around method flow diagram
- Fix application crash when parameters with wrong option type are defined in script
- Fix issue where method scripts sometimes crashed when maintenance buffer was defined in header
- Fix issue where linking parameters via drag and drop is not possible during search in methods
ASSAYS
- Fix random software crashes while working with assays
- Fix issue where buffer bottles had wrong name
- Fix issue of starting invalid scripts
- Fix assay parameters not getting properly updated on method update
- Fix run parameter values not updating in the UI after change
- Fix issue where application crashed while containers were swapping in sample tray
ANALYSES
- Fix cropped exponential x-axis scaling factor when exported
- Fix filtering of data within an analysis element not propagated between subsequent operations
- Fix export of analyses using single source for multiple measurements missing the experiment
- Fix issue where grouped experiment measurements are not displayed in manual analysis
- Fix missing persistence of fit initial value changes by the user
- Fix crash of helios when analyzing RT-IC experiment
- Fix fit parameter initial values not being restored correctly
- Fix legend orientation being incorrect for top and bottom placement
- Fix reset of full-range kinetics fits after data modification potentially leading to biased results
- Fix crash when copying and pasting an element in manual analysis
- Fix curve specific operations resetting when applied after referencing operations
- Fix y-axis associated parameter adjustment in Spot Fluorescence Normalization
- Fix issue where an exception was thrown after clicking on Parameter Table in predefined Kinetics
- Fix issue where plots would not render for the integral curves
- Fix issue where application would crash during a plot zoom
- Fix crash of application upon changing NaN values in reset-initial-values table of a fit operation
EXPERIMENTS
- Fix failing aggregation by experiment when chip is not defined
- Fix images missing on initial experiment aggregation
- Fix application crash when viewing images on a running experiment
- Fix incorrect image filter range for running experiment
- Fix issue where the started experiment can not be opened
OTHER
- Fix configured proxy interfering with documentation download
- Fix configures proxy interfering with initial heliX connection
- Fix exception thrown when device tab was closed while device was loading
- Correct typo in description
- Fix issue where application crashed while filtering documents using tags
PERFORMANCE IMPROVEMENTS
- Improve performance of displaying plots
- When duplicating an Automated Analysis as a Manual Analysis, changes within the Manual Analysis may be reflected in the Automated Analysis. To restore the unmodified state of the Automated Analysis, you have the following options:
- Recalculate the Automated Analysis without changing any parameters
- Save, close, and reopen the Automated Analysis
In case you need help, please do not hesitate to contact our support team at support@dynamic-biosensors.com.
INSTALL INSTRUCTIONS
We recommend to always use the newest versions of heliOS and heliX firmware.
Please update first your heliX device with the latest firmware version before installing a new version of heliOS.
SYSTEM REQUIREMENTS
Supported Operating System I Windows 10 and higher
heliOS requires the .NET 6 Desktop Runtime.
heliOS requires access to a postgreSQL database.
heliX FIRMWARE UPDATE
Note: The installation of a new heliX firmware version must be performed from a computer which is connected to the heliX device.
Note: Skip this step if you are only interested in updating the heliOS version on a computer which is not used to control the heliX device.
- Ensure that the heliX device is switched on and connected to the control PC (directly or via network).
- Download the above listed version of the heliX firmware. We recommend to always use the newest version.
- Run the EXE installer on the control PC and follow the setup steps. You can find the IP address of your heliX in heliOS under Devices.
After approx. 10 minutes the heliX will be restarted and ready to use.
INSTALLATION OF heliOS
Note: If heliOS is installed for the first time on a computer you need to first install the .NET 6 Desktop Runtime (see Installation of Microsoft .NET 6) and a PostgreSQL database (see Installation and setup of postgreSQL database).
- Download the above listed version of heliOS. We recommend to always use the newest version.
- Run the MSI installer and follow the setup steps.
- The first time you open heliOS on a computer you need to enter your license key (Settings → License).
Copy and paste the license key into the intended input field and confirm. - In addition to 3, the first time you are using heliOS you need to enter your database access data (Settings → Database).
- Now heliOS is ready to use and can, for example, be connected to your heliX device.
IMPORT OF heliOS METHODS
- Download the above listed heliOS methods.
- Unzip the downloaded file once. The unzipped folder contains a range of zipped heliOS methods. Do not unzip these files.
- Open heliOS and go to “Methods”.
- Click on “Import” in the top menu and select one or several heliOS methods (ZIP files) from the unzipped folder.
- Click on “Open”. Now your data base is equipped with the newest heliOS methods.
INSTALLATION OF MICROSOFT .NET 6
Note: heliOS requires the .NET 6 Desktop Runtime on your Windows operating system. If already installed you can skip this step.
- Download the .NET 6 Desktop Runtime installation file (64-bit version).
- Run the EXE installer and follow the setup steps.
- After the installation process has finished you are ready to install heliOS.
INSTALLATION AND SETUP OF A postgreSQL DATABASE
Note: heliOS requires a postgreSQL database either on a server in your local network or on your Windows operating system. The heliX control computer already comes with a set up postgreSQL database. Continue only if you want to install a second postgreSQL database on another computer.
- Download postgreSQL from the link below. Select version 12.X for Windows x86-64.
https://www.enterprisedb.com/downloads/postgres-postgresql-downloads - Run the EXE installer and follow the setup steps. Use the default settings and enter a password of your choice. We recommend to use the same password as on the heliX control computer (mypassword). Do not launch the Stack Builder at the end of the installation wizard.
- After the installation of postgreSQL open the Windows Run app (or press the Windows+R keys on the keyboard).
- Enter the following command line into the field and confirm: c:\Program Files\PostgreSQL\12\bin\createdb.exe -U postgres heliOS
- You now will be asked for a password. Enter the password you selected during the postgreSQL installation and press Enter. If you will be asked again for the password, enter it again and confirm with the Enter key.
- Repeat step 3 and enter the following command line into the field. Confirm afterwards: c:\Program Files\PostgreSQL\12\bin\createuser.exe -P -Upostgres heliOS
- Repeat step 5 (Enter the password).
- Now, you can start heliOS with the following database credentials (Settings → Database):
Host: localhost | Database: heliOS | User: heliOS | Password: [your password] - Enter your heliOS license key (Settings → License) if necessary.
If you need help with setting up the postgrSQL database please ask your system administrator or contact our support team at support@dynamic-biosensors.com.
In case you need help, please do not hesitate to contact our support team at support@dynamic-biosensors.com.
Questions?
Contact Us
Our support team is happy to help.